Setting up webhooks
Learn how to set up webhooks for WP Full Pay.
Table of contents:
- What's webhooks and why should you set up?
- How to set up webhooks?
- Verifying webhooks on Stripe dashboard
- Verifying webhooks on WP Full Pay
- Troubleshooting
Why do you need webhooks?
A webhook is a mechanism that allows one system or application to send real-time data to another system or application when a specific event occurs.
There is a one-way communication between WP Full Pay and Stripe by default; the plugin sends requests to Stripe via the Stripe API.
Stripe webhooks make it possible to send messages in the other direction, so Stripe can notify the plugin when certain events occur.
While WP Full Pay is functional without webhooks, webhooks are required to use the plugin to its full potential.
Which WP Full Pay features require webhooks?
For working properly, the following features require webhooks:
- Payment in installments - type subscription plans
Synchronizing charge status from Stripe to the plugin
(For example, you made a refund in Stripe, not in WP admin)
How to set up webhooks?
Setup procedure in a nutshell
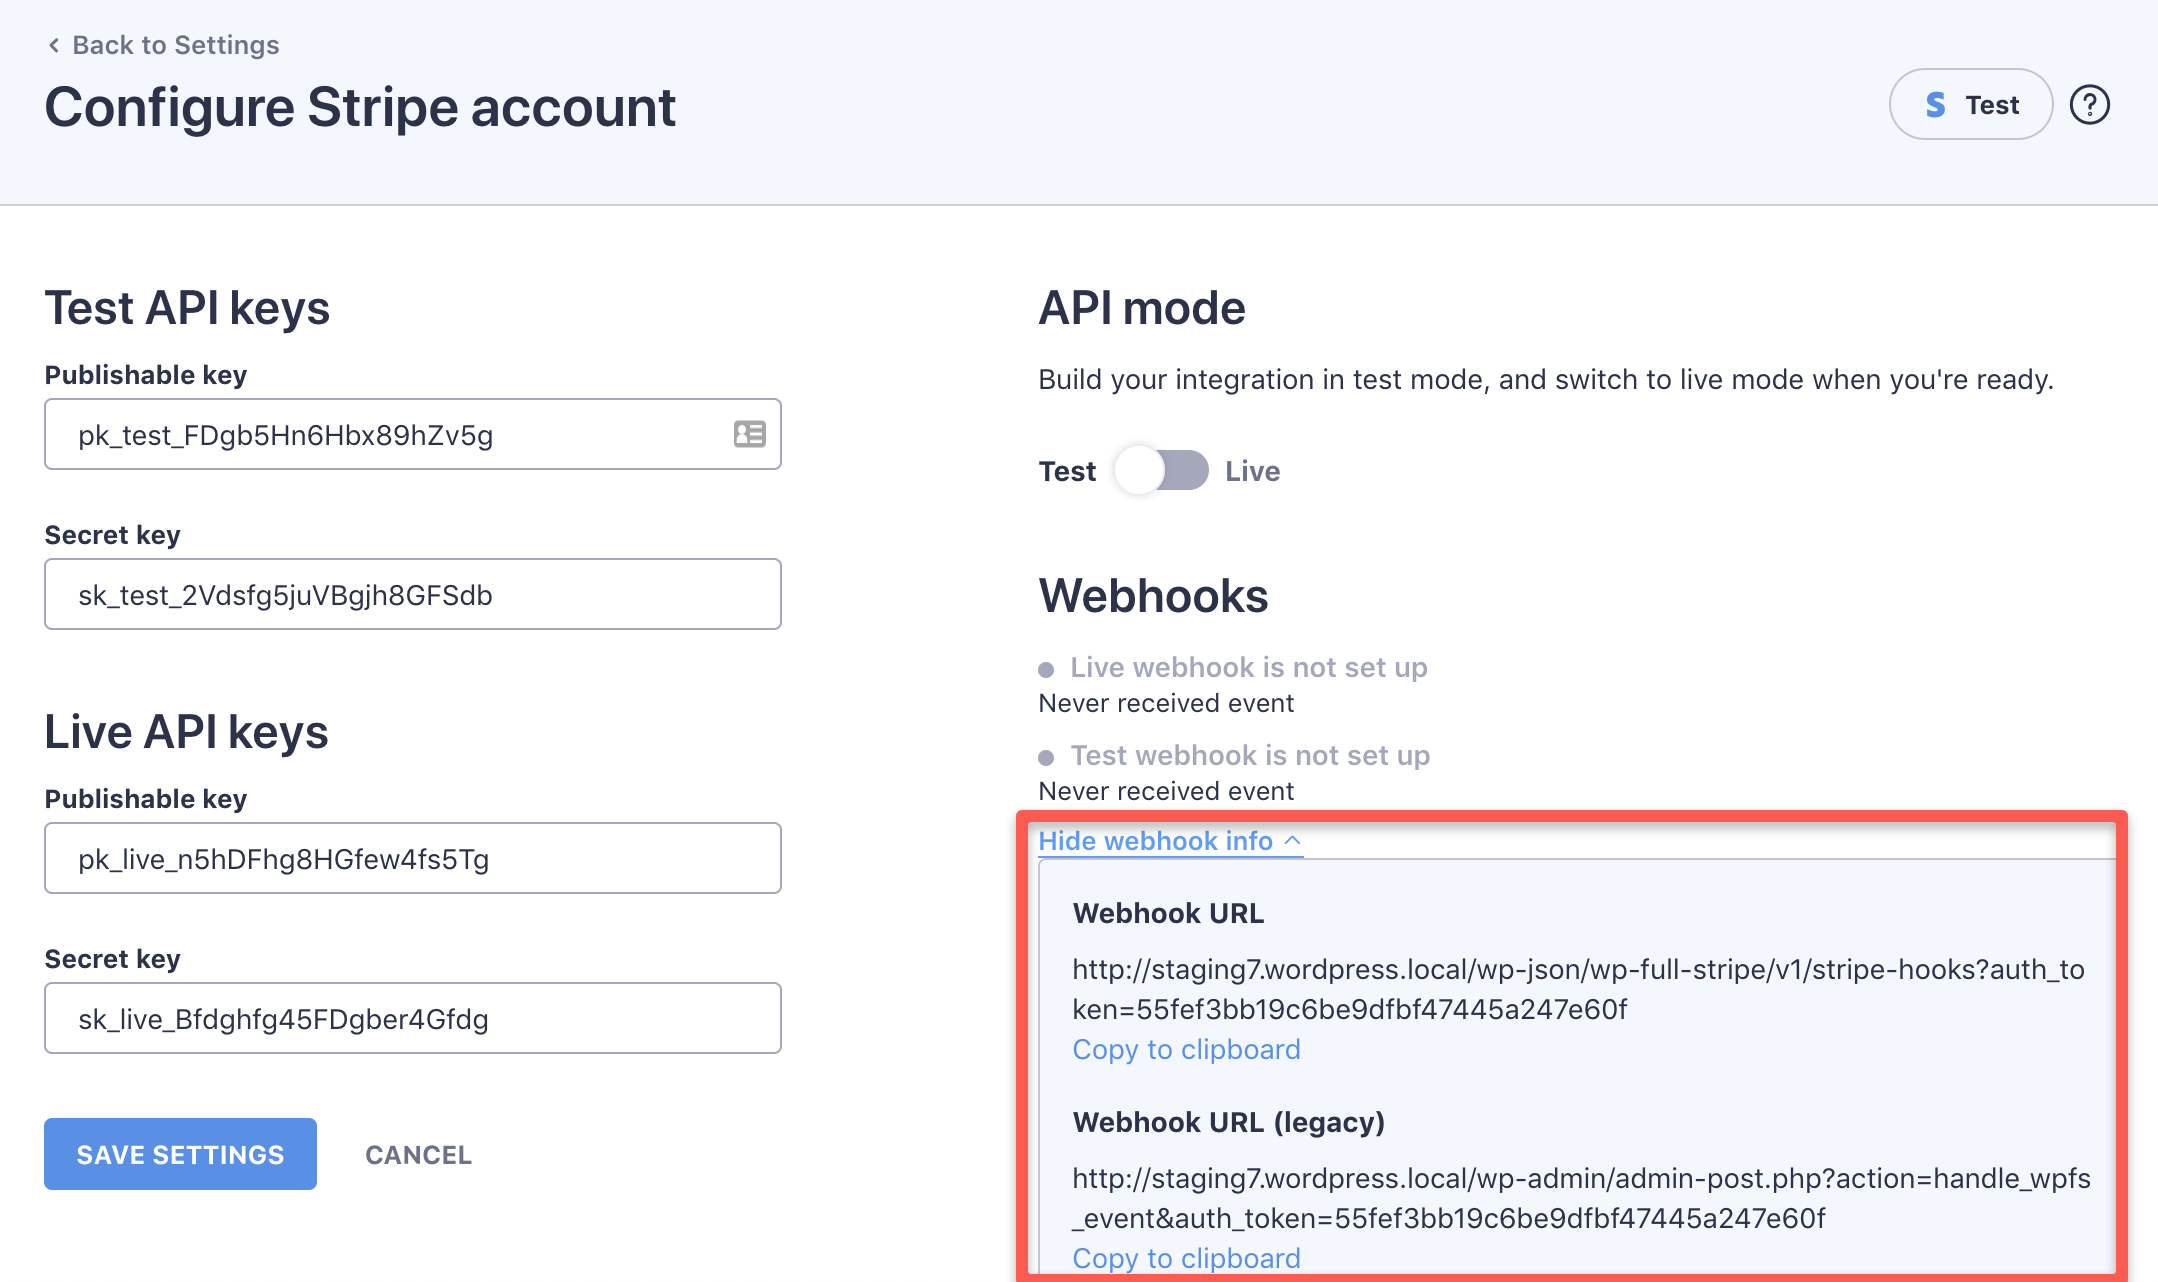
- Write down the Stripe webhook URL of the plugin on the Full Pay → Settings → Stripe account page in WP admin.
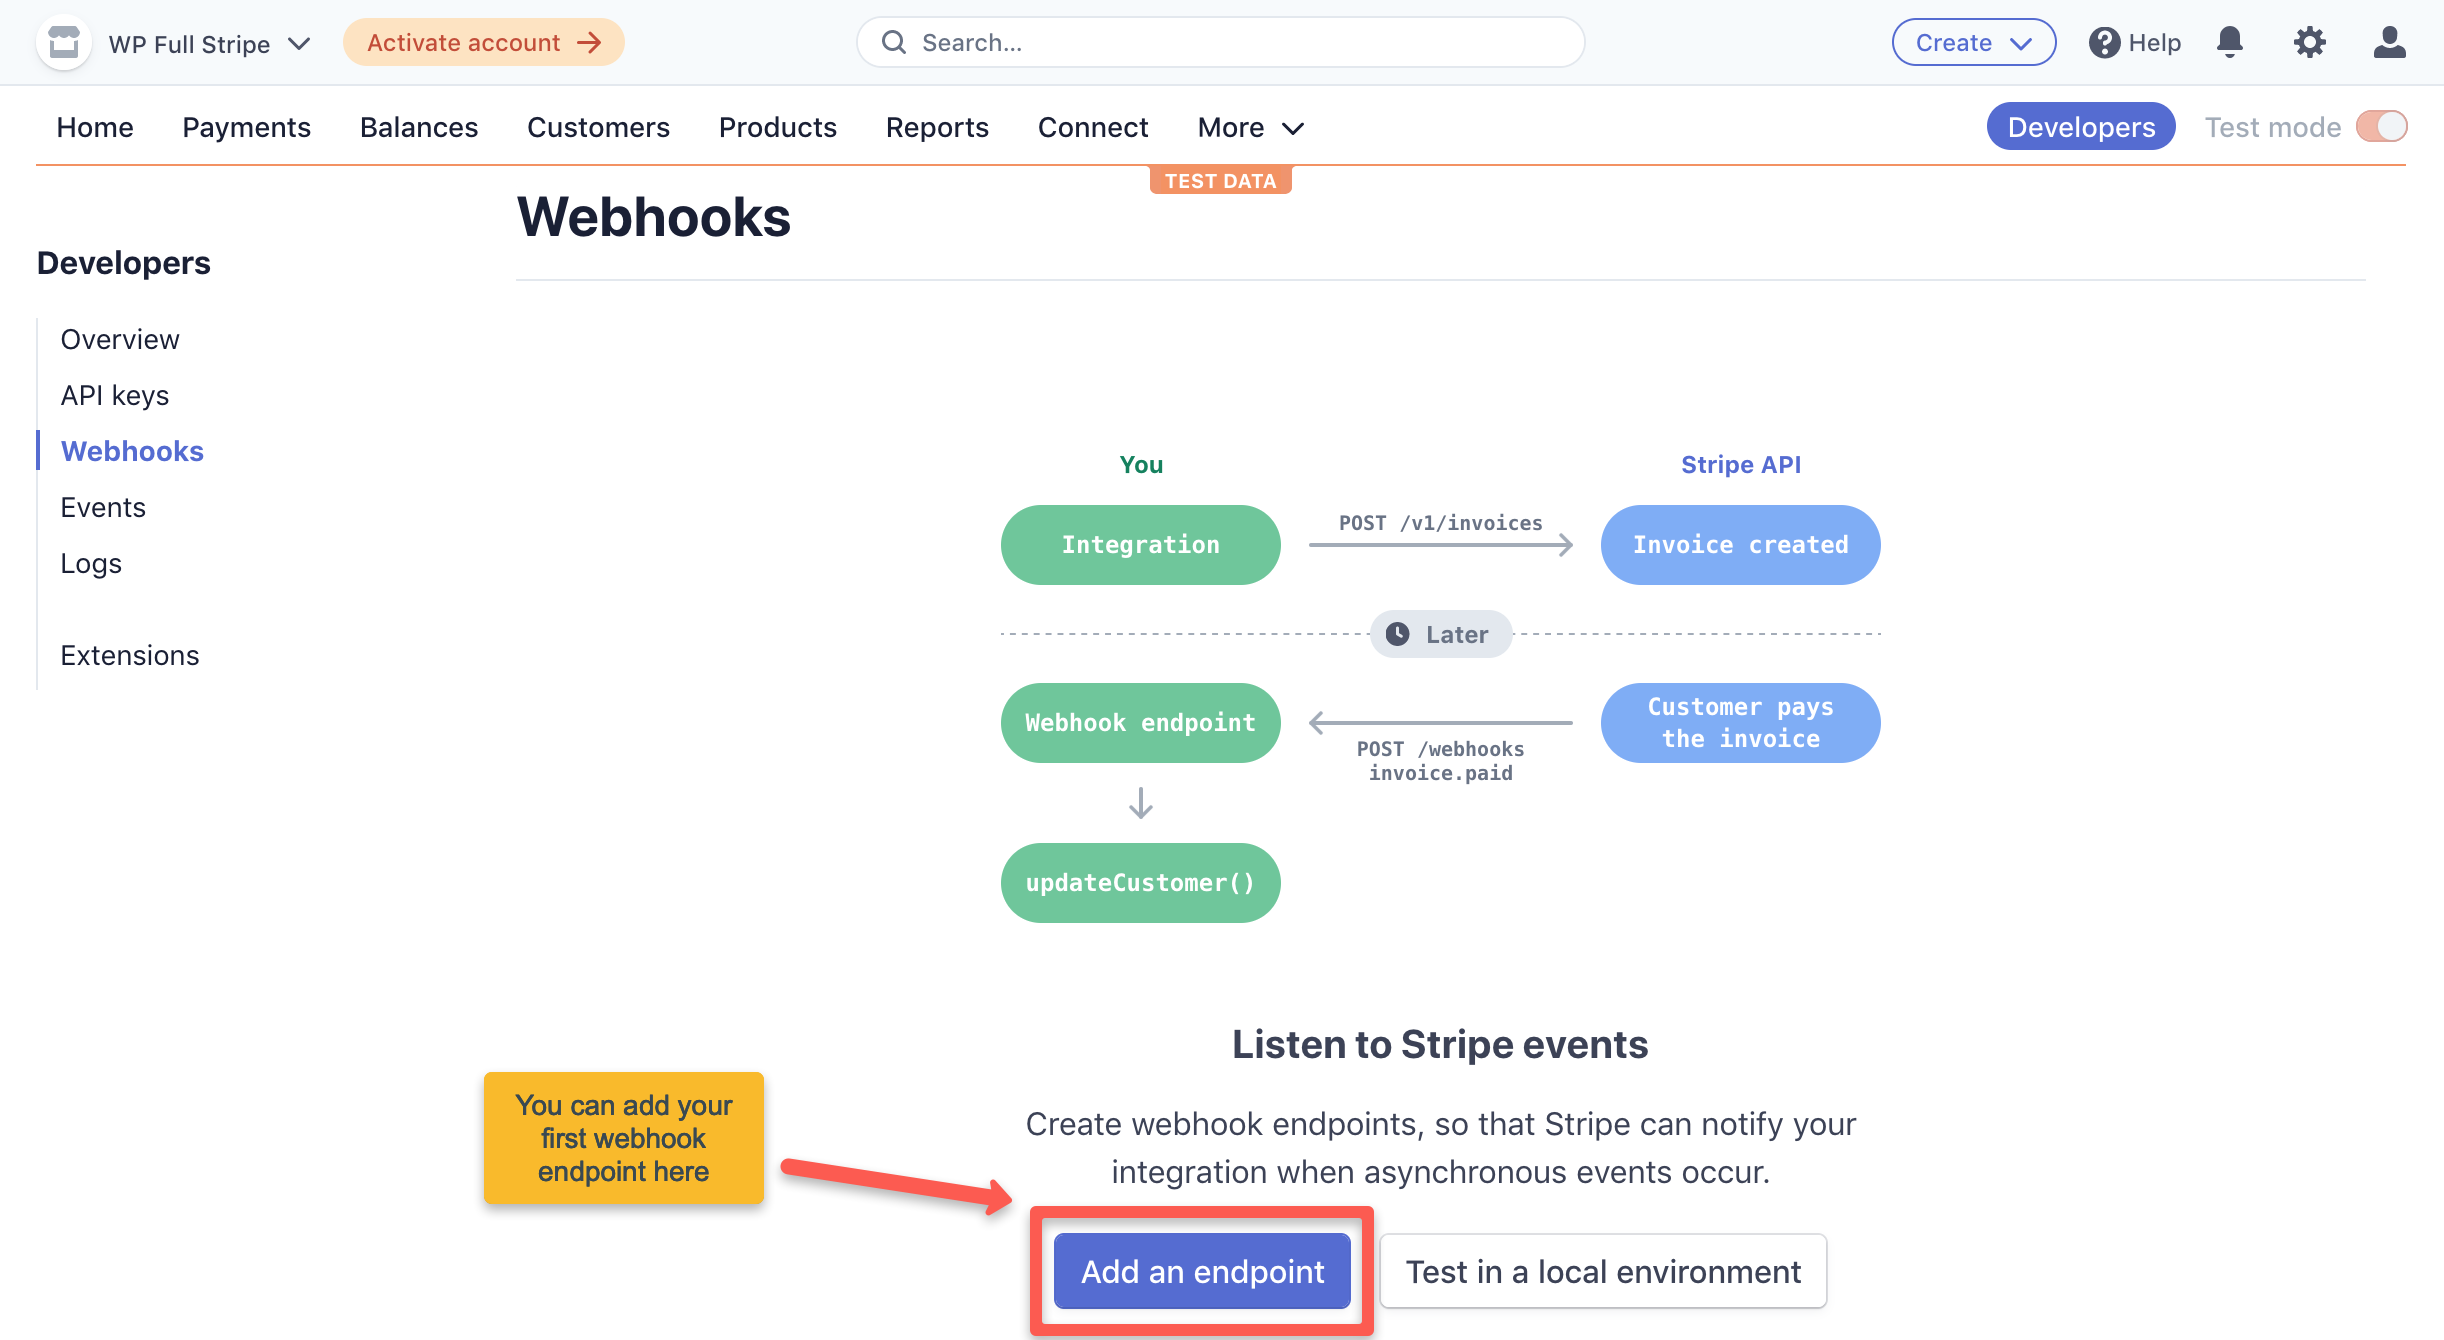
- Go to the Developers / Webhooks page on the Stripe dashboard.
- Press the “Add endpoint” button, and fill in the form as follows:
- Endpoint URL: Paste the webhook URL of the plugin
- Select events to listen to: Select the following events:
- charge.captured
- charge.expired
- charge.failed
- charge.pending
- charge.refunded
- charge.updated
- charge.succeeded
- customer.subscription.deleted
- invoice.created
- invoice.payment_succeeded
- Switch to live mode
- Repeat step 3) in live mode
Setup procedure with screenshots
1. Write down the Stripe webhook URL you can find on the Full Pay → Settings → Stripe account page
2. Go to the Developers → Webhooks page on the Stripe dashboard, and press the Add endpoint button
3. Configure the endpoint URL, and press the “Select events” button

4. Search/check the required events, and press the “Add events” button

When the events are added, press the “Add endpoint” button as well.
Make sure that only one webhook endpoint is set up per API mode (one for test, and one for live).
5. Switch to live mode
Switch to live mode by pressing the “Test mode” toggle in the top-tight corner:

6. Configure webhooks in live mode
Repeat steps 2), 3), and 4) in live mode.
Verifying webhooks on the Stripe dashboard
Stripe removed webhook testing temporarily
You can test your webhook configuration by making a test payment .
You can test your webhook setup by sending a test webhook event to the plugin.
Follow these steps:
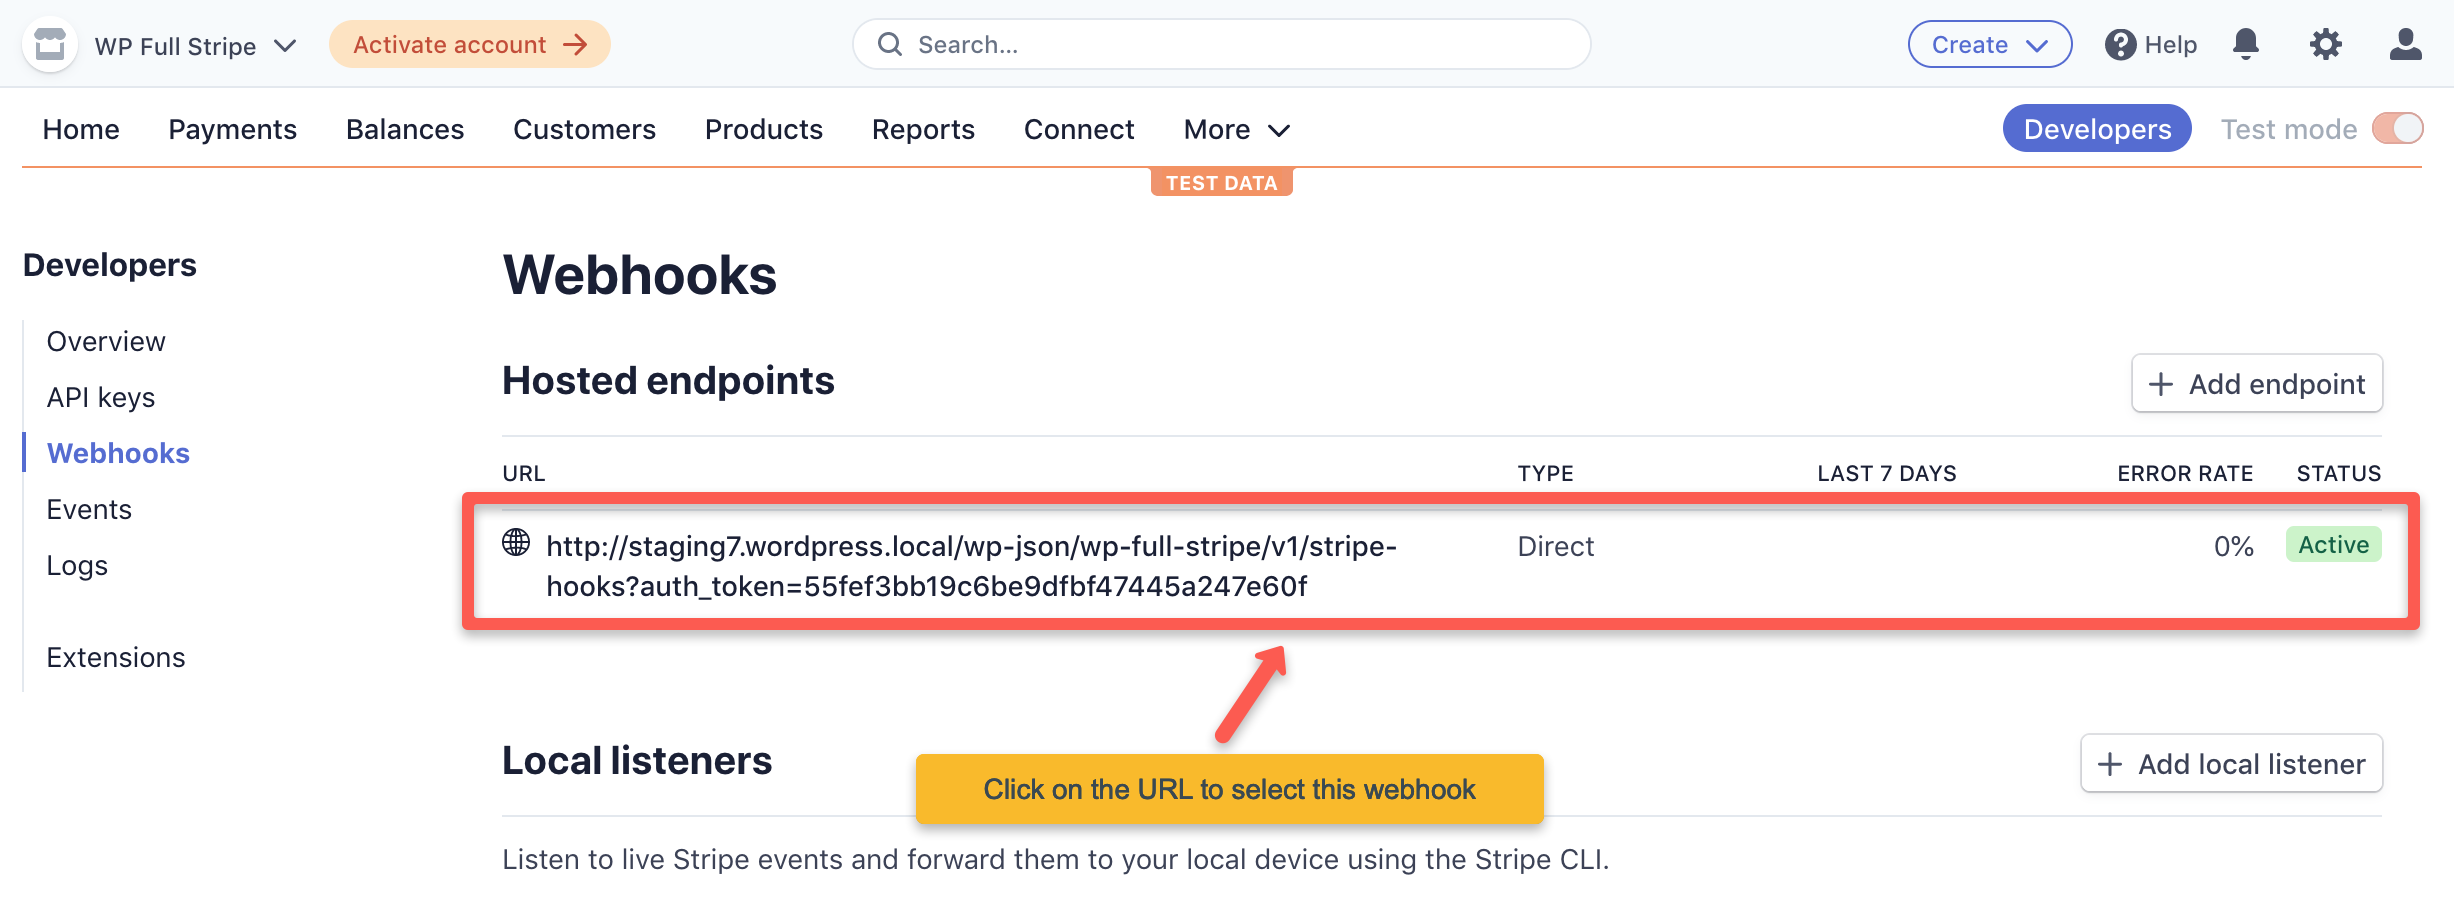
- Go to the Developers / Webhooks page on the Stripe dashboard, and select the webhook you’d like to test.
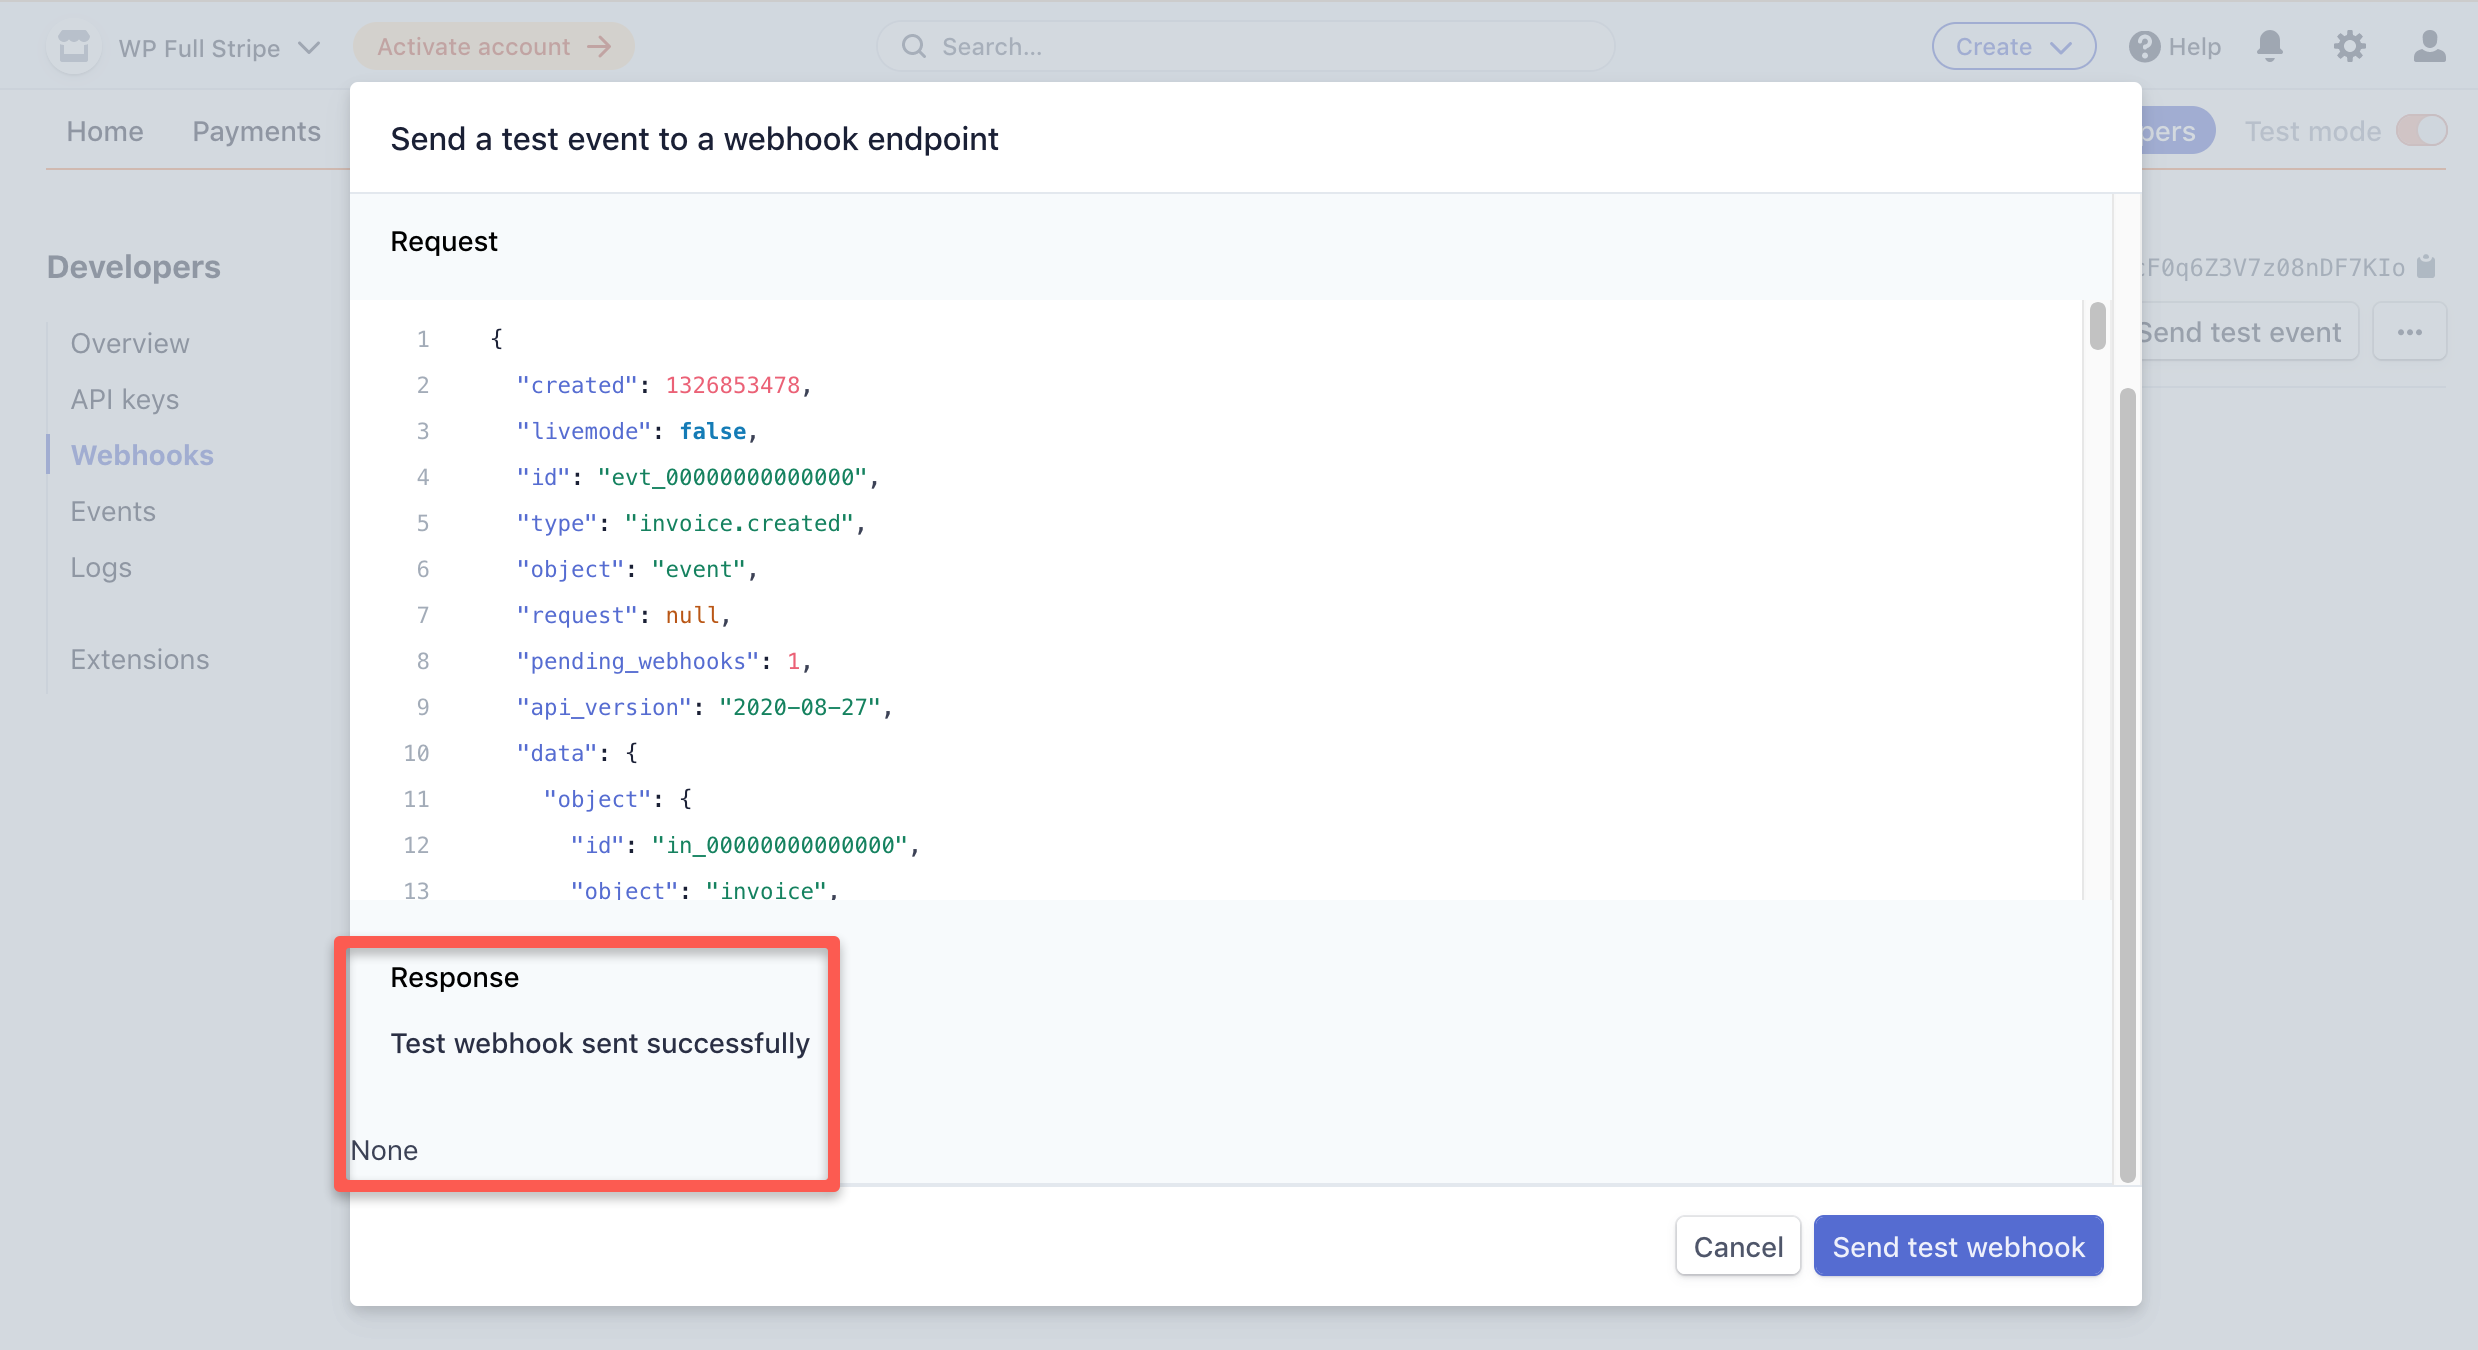
- Press the “Send test event” button.
- Select an event (any event will do), and press the “Send test webhook” button.
- Verify in Stripe that sending the event was successful.
- Verify in the plugin that receiving the event was successful.
Lets see the test procedure with screenshots:
1. Go to the Developers / Webhooks page on the Stripe dashboard, and select the webhook you’d like to test
2-3. Press the “Send test event” button, and send a test webhook

4. Verify that sending the event was successful
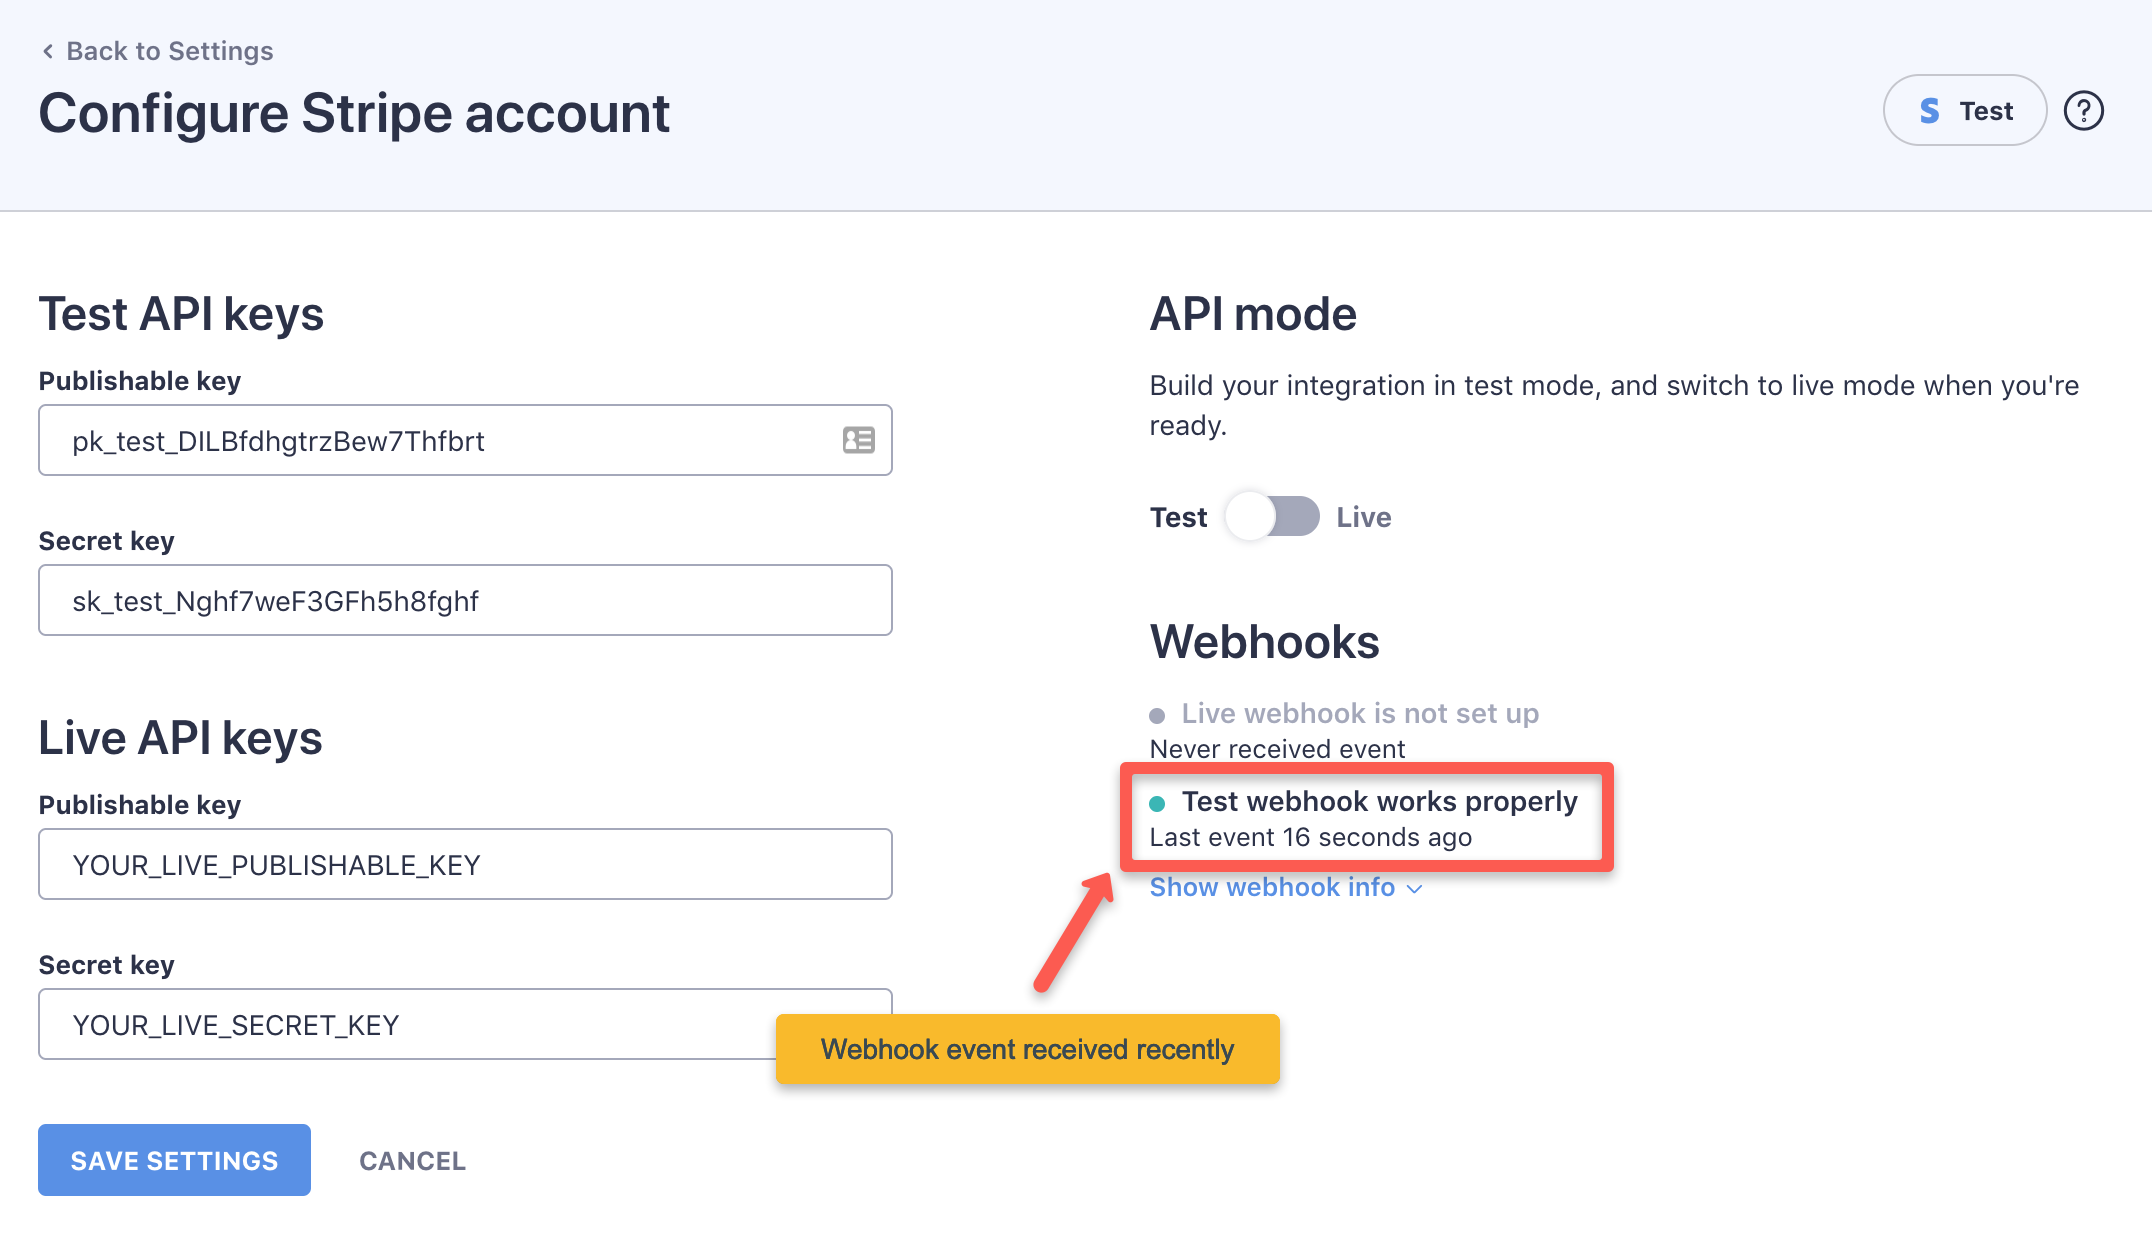
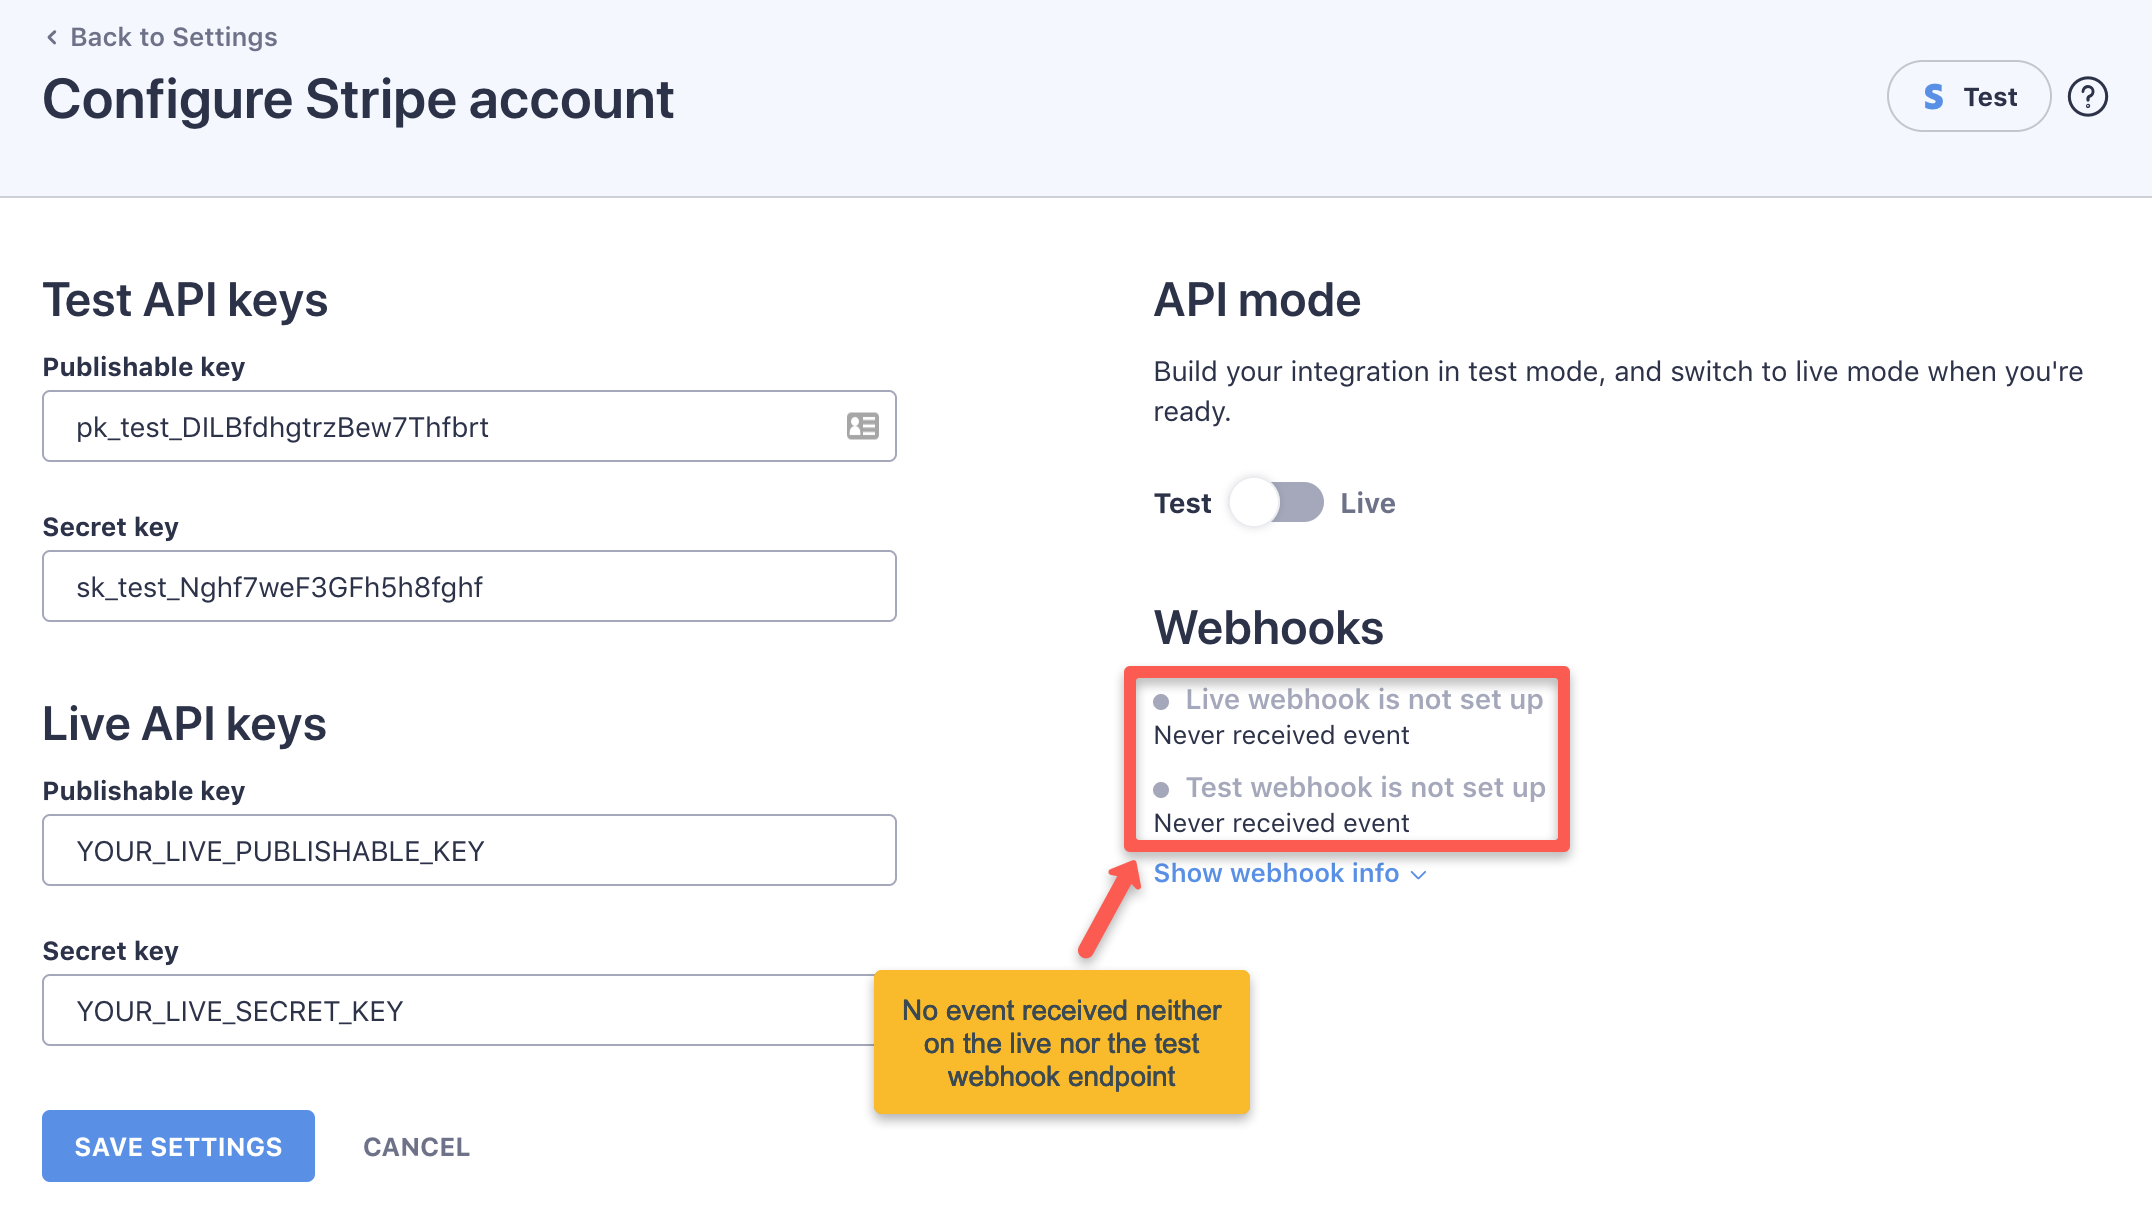
Verifying webhooks in WP Full Pay
The final step to check the webhook endpoint status in the plugin on the Full Pay → Settings → Stripe account page in WP admin.
If the webhook endpoint is configured properly, then you’ll see a green status indicator, and the time the last event was sent:
If the webhook endpoint is not configured properly, then you’ll see a grey status indicator:
Troubleshooting
You’ll find the most common errors with possible solutions in this section.
Webhook sent successfully but response is not empty
You are sending a test webhook from the Stripe dashboard.
Stripe says that “Test webhook sent successfully” but the response is not empty.
This usually means that there is a security plugin blocking the /wp-admin/admin-post.php URL.
Enable this URL for external callers, or add an exception so that the security plugin doesn’t block this URL.
Test webhook error: 503. Lookup <your_host>: no such host
This happens when are trying to send a webhook to local test environment, or there are issues with the DNS entries of <your_host>.
Verify your DNS settings, or use a globally accessible domain name for your test site - consider DynDNS or similar.
Test webhook error: 401
It means that the webhook endpoint rejected the webhook request.
It usually happens when the authentication token is not valid anymore. Compare the webhook URL in Stripe and in the plugin.
Test webhook error: 404
It means the webhook URL doesn’t exist.
Maybe a few characters of the URL were left off, consider copying and pasting the webhook URL to Stripe again.
List common Stripe webhook events provided
| Event | Description |
|---|---|
| charge.succeeded | a payment was successfully processed |
| invoice.payment_failed | a payment for an invoice failed |
| customer.subscription.created | a customer subscribed to a plan |
| customer.subscription.updated | a subscription was updated |
| customer.subscription.deleted | subscription was canceled |
| dispute.created | a dispute was created for a charge |
| payout.created | a payout to your bank account was initiated |
| checkout.session.completed | This event is sent when a customer successfully completes the checkout process and the payment is confirmed |
| checkout.session.async_payment_failed | Indicates that a payment attempt for a Checkout Session has failed |
| checkout.session.async_payment_succeeded | Indicates that a payment attempt for a Checkout Session has succeeded. |
| checkout.session.completed | Indicates that a customer has successfully completed the Checkout process. |
| customer.subscription.created | Sent when a new subscription is created for a customer. |
| customer.subscription.updated | Sent when a subscription is updated, such as changing the subscription plan or quantity. |
| customer.subscription.deleted | Sent when a subscription is canceled or expires. |
| invoice.created | Sent when a new invoice is created for a subscription. |
| invoice.payment_failed | Sent when a payment for an invoice fails. |
| invoice.payment_succeeded | Sent when a payment for an invoice succeeds. |
| invoice.updated | Sent when an invoice is updated, such as when a subscription change triggers a proration. |
| subscription_schedule.updated | Sent when changes are made to a subscription schedule, such as adding or removing phases. |
| account.updated | Sent when an account's properties are updated |
| account.application.deauthorized | Sent when an account removes an application from the connected applications in their dashboard. |
| balance.available | Sent when the available balance is updated. |
| charge.captured | Sent when a charge is captured. |
| charge.failed | Sent when a charge attempt fails. |
| charge.refunded | Sent when a charge is refunded. |
| charge.succeeded | Sent when a charge is successful. |
| checkout.session.completed | Sent when a Checkout Session has been successfully completed. |
| customer.created | Sent when a new customer is created. |
| customer.deleted | Sent when a customer is deleted. |
| customer.updated | Sent when a customer's properties are updated. |
| invoice.created | Sent when a new invoice is created. |
| invoice.finalized | Sent when an invoice is finalized. |
| invoice.payment_failed | Sent when an invoice payment attempt fails. |
| invoice.payment_succeeded | Sent when an invoice payment is successful. |
| invoice.updated | Sent when an invoice is updated. |
| payment_intent.created | Sent when a new PaymentIntent is created. |
| payment_intent.succeeded | Sent when a PaymentIntent transitions to succeeded. |
| payment_intent.payment_failed | Sent when a PaymentIntent transitions to failed. |
| payout.paid | Sent when a payout is successfully sent to the bank. |
| payout.failed | Sent when a payout fails. |
| plan.created | Sent when a new plan is created. |
| plan.deleted | Sent when a plan is deleted. |
| plan.updated | Sent when a plan is updated. |
| subscription_schedule.created | Sent when a new subscription schedule is created. |
| subscription_schedule.updated | Sent when a subscription schedule is updated. |
| subscription_schedule.canceled | Sent when a subscription schedule is canceled. |