A Stripe donation form gives supporters a focused way to contribute on a WordPress site. The form still needs clear donation choices, a safe payment flow, and a complete test before it belongs on a live campaign page.
WP Full Pay, listed on WordPress.org under Themeisle, is the plugin used in this walkthrough. It creates dedicated donation forms with suggested or custom amounts and one-time or recurring frequencies.
This guide covers the practical build: connect Stripe, create the form, configure the choices, embed it, and test the entire donor journey. Plugin comparisons and broader fundraising strategy stay in their dedicated guides.
📖 Choosing the amounts themselves? Read the suggested donations guide. Still choosing a tool? Compare the best WordPress donation plugins.
Prepare WordPress and Stripe
Install and activate WP Full Pay, then complete its Stripe connection before creating the campaign form. For ordinary setups, the current connection flow uses Stripe Connect, so you do not need to paste API keys into the plugin.
- Confirm that the site uses HTTPS and that WordPress, WP Full Pay, and the active theme are updated.
- Open Full Pay → Settings → Stripe account, select Test, and choose Connect with Stripe for the intended account. Complete the connection until Test mode is enabled.
- Keep the form in Test mode until the success, decline, and authentication paths have been checked. Test and live connections, products, and forms remain separate.
- Prepare a thank you page, donor contact address, campaign description, and a clear explanation of how contributions will be used.
💡 Build the form in test mode first. A polished page is not ready until a test donation reaches the expected confirmation, transaction record, and receipt.
Go to Full Pay → Payment Forms and select Add form. The current WP Full Pay donation form documentation uses this screen as the starting point.
Enter a useful display name and select Donation as the form type. The identifier is generated from the display name and is used when the form is embedded, so choose a name that will still make sense when several campaigns exist.
Next, choose the layout. An inline form keeps the payment fields on the campaign page. A Checkout form sends the donor to a Stripe-hosted checkout page and then returns the donor to the site. The current layout guide explains the operational differences. Pick the layout that matches the campaign, then select Create & edit form.
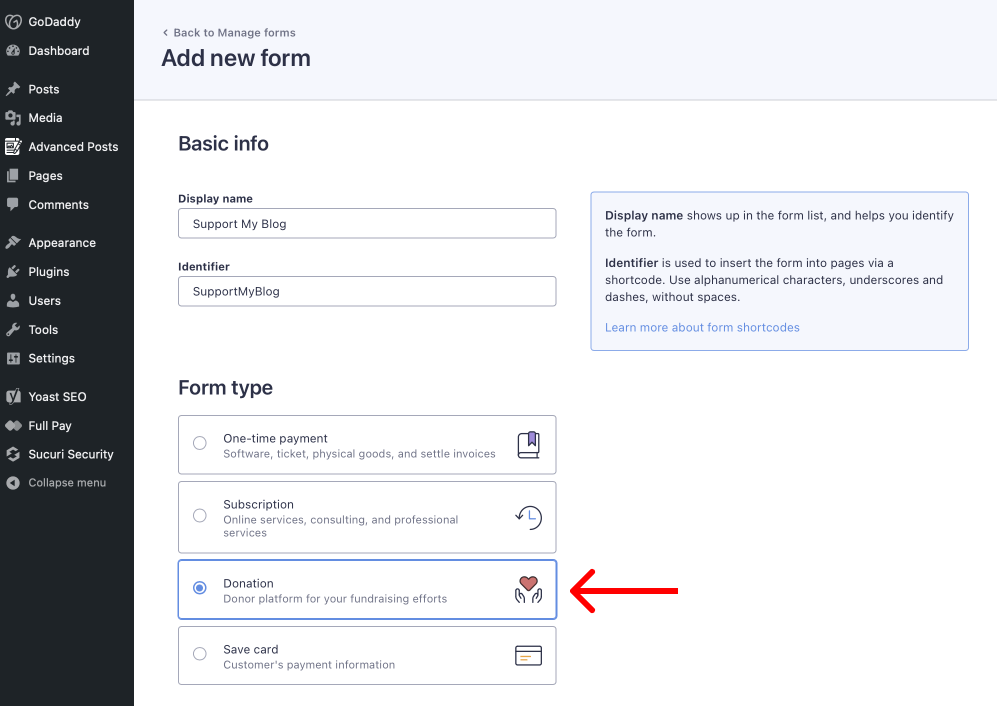 Selecting Donation gives the form its donation-specific amount and frequency controls.
Open the form’s Payment tab. Choose the campaign currency, then configure what supporters can give. The settings should be easy to understand without forcing every donor into the same amount.
Set suggested and custom amounts
- Suggested donation amounts: Add a short list of preset amounts in the form’s currency. Reorder them into the sequence donors should see.
- Allow custom amount to be entered: Enable this when supporters should be able to type a different amount.
- Minimum donation amount: Set a practical floor when custom amounts are enabled. The floor should account for the campaign’s processing and administration costs without being presented as a universal rule.
Offer one-time or recurring donations
Under Donation frequencies, select at least one option. Choose One-time for a single contribution. Daily, weekly, monthly, and annual options create recurring donations. Only expose frequencies that the organization can explain, support, and reconcile.
| Campaign need | Useful form choice | What to verify |
|---|
| A single appeal or emergency campaign | One-time giving, with suggested amounts and an optional custom amount | The minimum amount, receipt text, and thank you message fit this campaign. |
| Ongoing program support | One-time plus a clearly labeled recurring frequency | Supporters can tell which option repeats and how they can manage it later. |
| Several recurring choices | Only the intervals the organization can administer | Every interval appears correctly in test transactions and donor communications. |
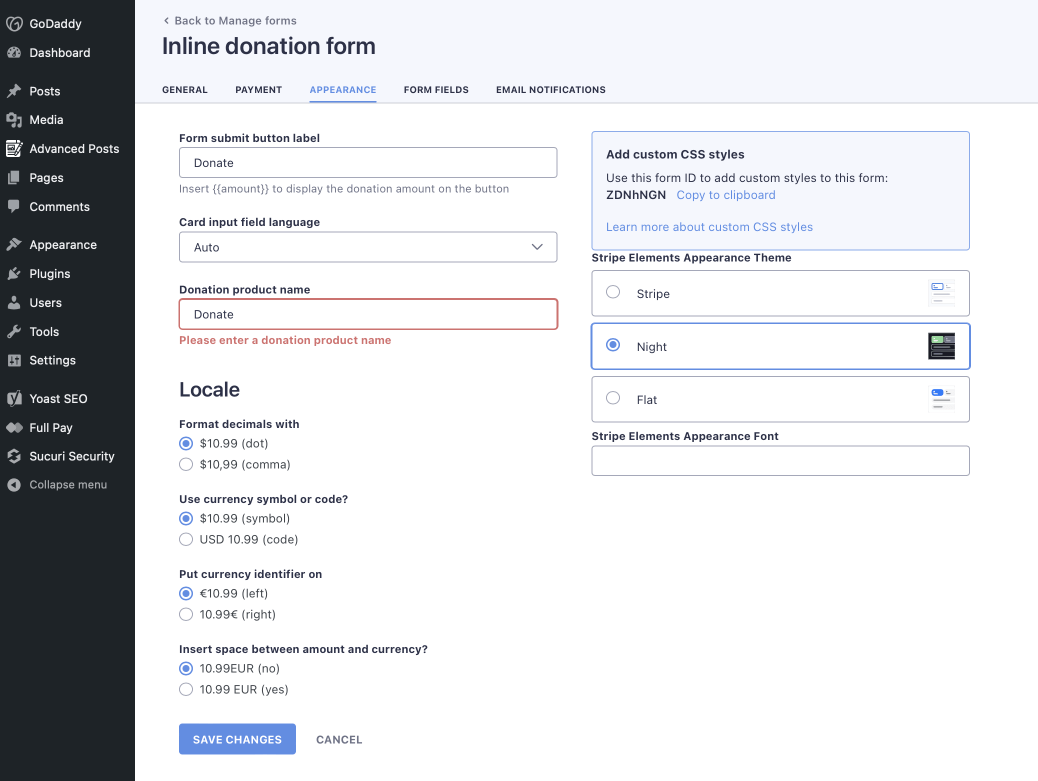 The form editor keeps campaign-specific payment and appearance choices in one place.
Use the General tab to decide what happens after a successful donation. You can show a confirmation message, redirect to a WordPress page or post, or send the donor to a custom URL. Keep that destination focused on confirmation, next steps, and contact details.
On the Appearance tab, enable Show donation goal if a public target helps explain the campaign. Enter the target in Donation goal. The current settings reference says the progress total includes succeeded, non-refunded donations for that form, while cancelled recurring donations are excluded. Check the displayed total against the transaction records before promoting it.
WP Full Pay’s current WordPress.org listing also confirms an anonymous donation option. Its public settings reference does not name the exact field or menu location, so confirm the label in the installed version before promising anonymity. Test what is hidden from public view and what transaction information remains available to authorized administrators.
Review the form’s donation receipt under Notifications and Integrations. A receipt should identify the organization and contribution, but tax-deductibility language must match the organization’s legal status and local requirements.
Save the form and return to Full Pay → Payment Forms. Copy its generated shortcode, open the campaign page, add a Shortcode block, and paste it. The official shortcode guide documents the same workflow.
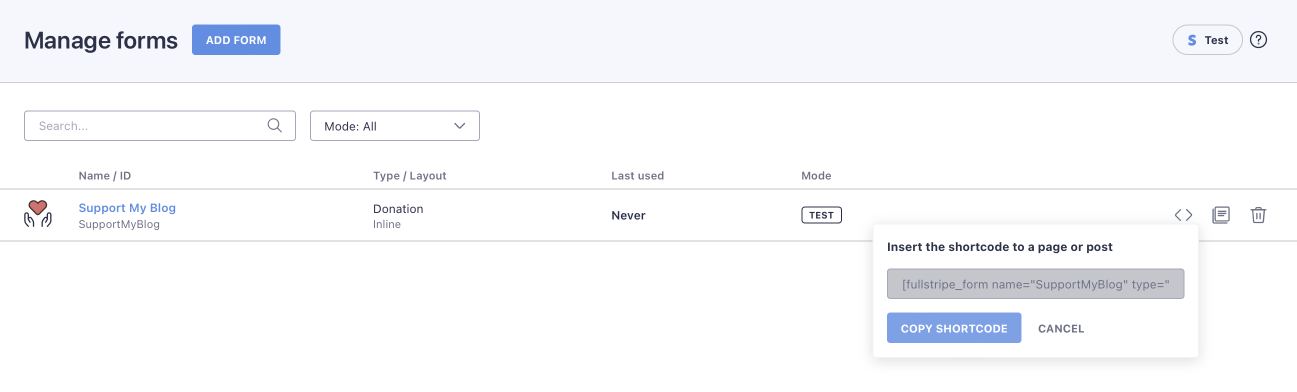 Copy the shortcode for the exact donation form that was configured and tested.
You can also add the WP Full Pay Gutenberg block and select the form by its identifier. Preview the page at desktop and mobile widths. Confirm that the amount controls, frequency labels, consent text, submit button, and campaign explanation remain readable.
Test the complete donation flow
Open the published test page while WP Full Pay remains in Test mode. Use Stripe test cards to exercise relevant outcomes without moving real money.
- Complete a suggested one-time donation and confirm the amount, currency, success message or redirect, transaction record, and receipt.
- Enter a valid custom amount, then try a value below the configured minimum and confirm the validation is clear.
- If recurring giving is enabled, complete each offered frequency and verify that Stripe records the intended recurrence.
- Run a declined payment and an authentication-required payment. Confirm that the donor sees a useful message and can try again without duplicate records.
- Test the anonymous option and donation goal separately. Verify the intended privacy behavior and confirm that only eligible successful donations change the progress total.
- Repeat the path on a phone, including the return from Stripe Checkout when that layout is used.
⚠️ A successful test payment proves only the route that was tested. Check one-time and recurring choices, custom amounts, failures, authentication, receipts, redirects, and mobile layout before launch.
Switch to live mode safely
Before launch, configure reCAPTCHA v2 under Full Pay → Settings → Security. WP Full Pay’s current guidance also recommends a Checkout donation form during an active card-testing attack because Stripe hosts that payment step and applies its own protections.
Return to Full Pay → Settings → Stripe account, select Live, and choose Connect with Stripe again. Complete the separate Live connection until it is enabled for the intended account.
Test and live data are separate. Duplicate the tested donation form for Live mode so it uses live objects and pricing, then embed the Live copy’s shortcode on the campaign page. Preview that page and verify the live form, account, currency, receipt settings, redirect, and recurring choices. If policy permits, complete one small live donation and reconcile it in both WP Full Pay and Stripe.
WP Full Pay can be installed from its free WordPress.org listing. Free use currently adds a 5% WP Full Pay application fee per transaction, and Stripe processing fees still apply. Check the current WP Full Pay plans before accepting live donations.
- Stripe is connected to the intended test and live account.
- Suggested amounts, custom amount rules, and frequencies match the campaign.
- The goal, anonymous option, receipt, and success destination behave as described.
- The embedded form works on desktop and mobile without broken labels or hidden controls.
- Success, decline, authentication, recurring, and live handoff checks are complete.
Once every item passes, the form is ready for editorial and organizational review. Keep the test page and checklist available whenever donation settings, Stripe connections, or the campaign page change.