If you’re utilizing Stripe to process payments on your WordPress website, various payment-related events such as successful or failed transactions, as well as disputed charges, occur within the Stripe platform, rather than directly on your site.
But how exactly are your website and Stripe interconnected?
How does a transaction initiated on your site seamlessly reflect within the Stripe platform?
It’s the Stripe webhooks that facilitate this connection.
Stripe webhooks let you know instantly if someone has subscribed to your protected content, successfully paid for your service, or disputed a charge.
So, what exactly are Stripe webhooks? Why and how should you use them?
Here’s a simple guide to answer all your questions.
What are Stripe webhooks?
Or, it’s even better to ask first: what are webhooks, in general?
To understand the concept, let’s take a simple example. Imagine you’re at home awaiting guests. The twist: your flat doesn’t have a doorbell.
How will you know when it’s time to open the door?
It’s more than likely that you’ll spend your day glancing through the window every five minutes to see if your guests have arrived. Exhausting, right?
Luckily, you can turn things around by installing a doorbell system: whenever a visitor pushes the button, you’ll hear the doorbell ring, allowing you to instantly open the door.
Webhooks do the same.
A webhook is a mechanism that allows your applications to transfer data in real time to one another whenever a given event occurs. They detect the event, collect the data, and send it to the URL specified by you in the form of an HTTP request.
For instance, let’s say you offer a free trial for your subscribers. To entice them to buy your service, you’d like to get a notification three days before the free trial ends. With the help of a webhook configured for the subscription event, the source site will send a HTTP POST request to a URL picked by you, with the details of the subscriber and an event identifier.
What does the process look like for Stripe webhooks?
They work the same way.
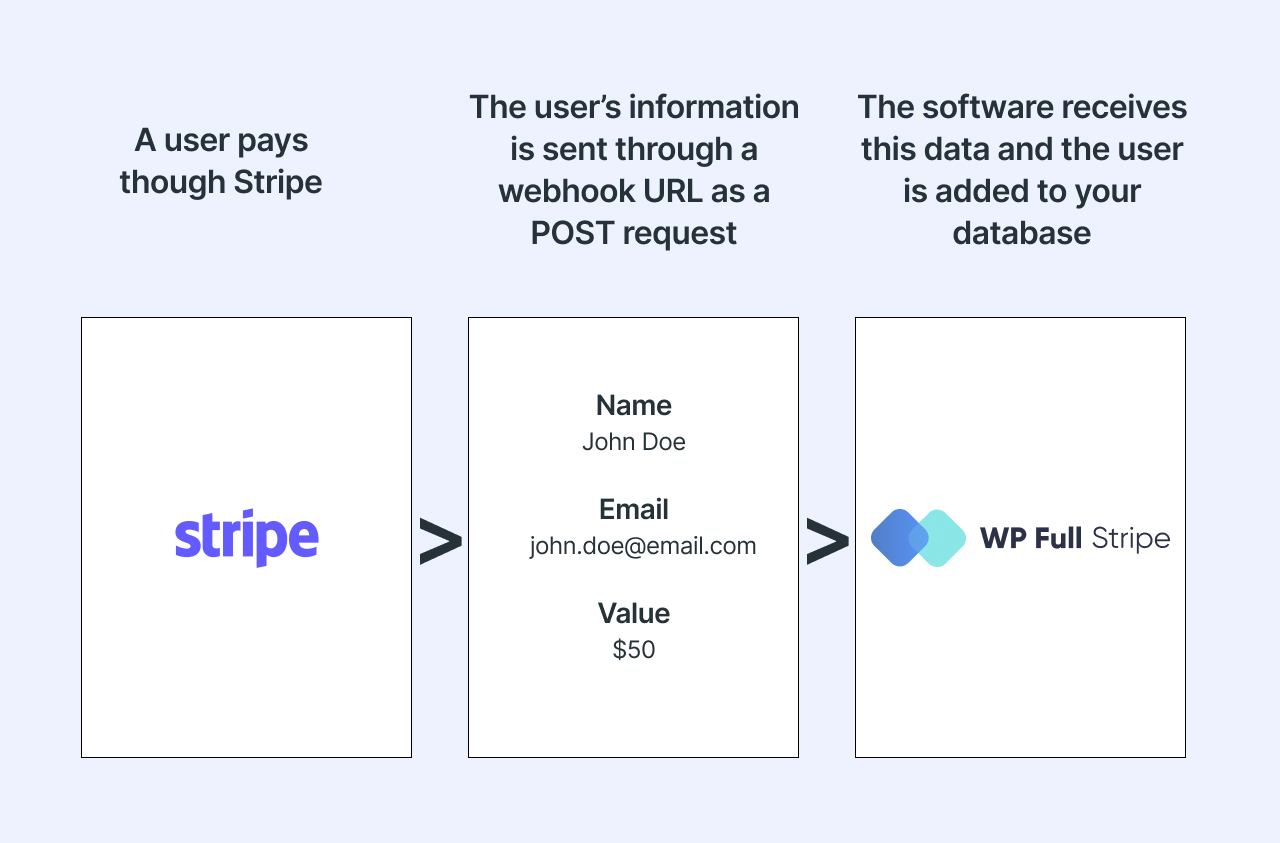
Stripe uses its webhooks to inform your website or application about different important updates in real time.
These real time updates or events can be a successfully completed checkout session, a failed charge attempt, or a customer disputing a charge, for instance. Stripe uses HTTPS to send these event notifications to your application as a JSON payload.
Why is it indispensable for your online business to use Stripe webhooks?
Stripe webhooks can save you an incredible amount of time and can enhance your business in many different ways.
A number of events that happen in your Stripe account are asynchronous. This means that communication and collaboration occur through messaging that’s not necessarily instant, such as notifications of payouts, recurring charges of subscriptions, or invoice-related notifications.
For these kinds of events, you’ll need Stripe webhooks to notify your integration about changes to the status of an object so that your integration can execute actions in your application or website’s backend system.
For instance, you can use Stripe webhooks as part of your dunning strategy. Webhooks help you connect your payment gateway with your email marketing software so that your subscribers get an email whenever a payment fails.
Or, you could use Stripe webhooks to receive the “checkout.session.completed” event. Once you’ve registered to receive this event, you’ll be notified whether your customer’s payment was successful or not after clicking the “Pay” button on your website.
When your webhook endpoint receives the event, your webhook function can run backend actions to fulfill an order. This could be calling your shipping provider’s APIs to schedule a shipment, for example.
The list of possible Stripe webhook events is long. You can find the full package here.
The specific advantages of Stripe webhooks
If you’re wondering why it’s worth using Stripe when it comes to webhooks, the answer is: Stripe webhooks event configuration is extremely flexible!
First of all, different webhook endpoints can be set up for test mode and live mode. Furthermore, any number of endpoints can be added per API mode. Delivery is also retried several times before an event is considered undeliverable.
You might also like to read about how to conduct Stripe test transactions.
Additionally, to easily troubleshoot problems, email and dashboard notifications are sent to the account owner and selected users with a detailed explanation of the issues encountered.
Convincing enough to make your (or your developer’s) life easier, right?
What’s the difference between Stripe webhooks and APIs?
You’ve probably heard APIs and webhooks mentioned together.
While APIs are also one of the ways that different applications use to communicate with each other, the main difference between Stripe webhooks and APIs is in how they handle data.
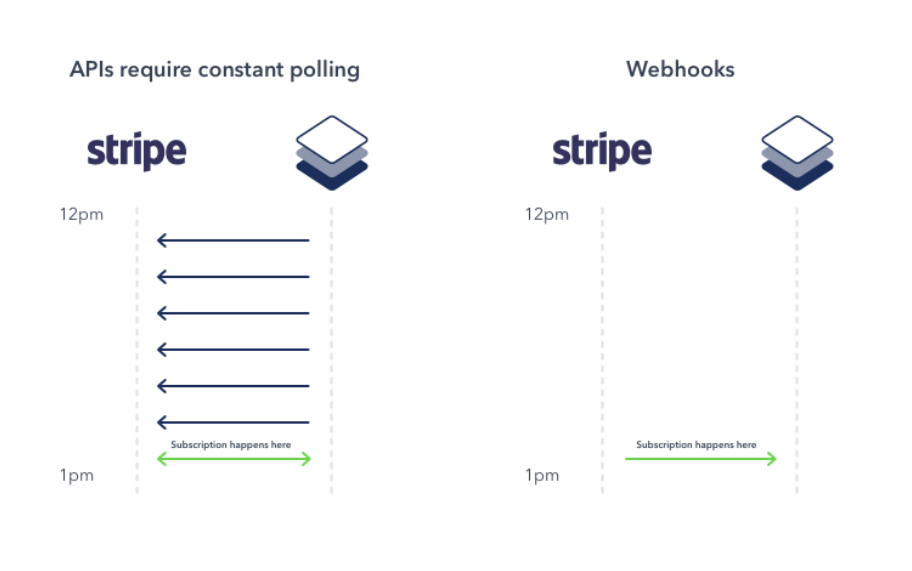
With an API, you have to manually “poll” for new information at regular time intervals.
Stripe webhooks, on the other hand, allow the provider to send data to your application the instant an event occurs.
This is why webhooks are also called “reverse APIs.” They’re less resource-intensive, as they save you time on constantly checking for new data.
Does this mean that APIs are useless?
Of course not!
They’re still popular for a number of reasons.
For instance, some applications don’t support webhook integrations. Knowing about every event could also be superfluous sometimes. Furthermore, you’ll need an API to make a change after being notified about an event.
Therefore, using Stripe webhooks together with APIs will be the optimal solution to ensure instant and reliable communication with your payment service provider.
Stripe webhook events
Stripe webhook events are notifications sent by the Stripe payment platform to your server to inform you about events that occur in your Stripe account. These events can include various actions and updates related to payments, subscriptions, customers, disputes, and more.
When certain events happen within your Stripe account, such as a successful payment or a subscription renewal, Stripe will send a POST request to a URL specified by you, known as the webhook endpoint. This URL typically points to a server-side script or application that listens for incoming webhook events.
Some common webhook events in Stripe include:
| Event | Description |
|---|
| charge.succeeded | a payment was successfully processed |
| invoice.payment_failed | a payment for an invoice failed |
| customer.subscription.created | a customer subscribed to a plan |
| customer.subscription.updated | a subscription was updated |
| customer.subscription.deleted | subscription was canceled |
| dispute.created | a dispute was created for a charge |
| payout.created | a payout to your bank account was initiated |
These events allow you to automate various tasks and keep your system synchronized with changes happening in your Stripe account.Here are common events related to Stripe Checkout webhooks:
| Event | Description |
|---|
| checkout.session.completed | This event is sent when a customer successfully completes the checkout process and the payment is confirmed |
| checkout.session.async_payment_failed | Indicates that a payment attempt for a Checkout Session has failed |
| checkout.session.async_payment_succeeded | Indicates that a payment attempt for a Checkout Session has succeeded. |
| checkout.session.completed | Indicates that a customer has successfully completed the Checkout process. |
These events enable you to automate tasks such as updating order statuses, sending confirmation emails, or triggering other actions based on the outcome of the checkout process.Common subscription webhook events in Stripe include:
| Event | Description |
|---|
| customer.subscription.created | Sent when a new subscription is created for a customer. |
| customer.subscription.updated | Sent when a subscription is updated, such as changing the subscription plan or quantity. |
| customer.subscription.deleted | Sent when a subscription is canceled or expires. |
| invoice.created | Sent when a new invoice is created for a subscription. |
| invoice.payment_failed | Sent when a payment for an invoice fails. |
| invoice.payment_succeeded | Sent when a payment for an invoice succeeds. |
| invoice.updated | Sent when an invoice is updated, such as when a subscription change triggers a proration. |
| subscription_schedule.updated | Sent when changes are made to a subscription schedule, such as adding or removing phases. |
WP Full Pay: a simple solution to receive Stripe events in your WordPress webhook endpoint
Now that you understand what Stripe webhooks are and how they work, the question may arise: is there a simple and budget-friendly Stripe payment plugin for WordPress that supports Stripe webhooks?
Well, if you have a WordPress site and are looking for a reliable and secure plugin to accept one-time and recurring payments through Stripe, WP Full Pay is the way to go!
By default, there’s one-way communication between Stripe and WP Full Pay. This means the plugin sends requests to Stripe via the Stripe API.
If you want Stripe to notify your website immediately when certain events occur, using Stripe webhooks make it possible to send messages in the other direction.
For instance, the status changes of one-time payments, donations, and subscriptions can be kept in sync with the server (if the changes are made on the Stripe Dashboard, not in WP Full Pay). Subscriptions with installment payments are also possible using Stripe webhooks, as the plugin can count the number of charges and generated invoices.
How to set up Stripe webhooks in WP Full Pay?
To configure your Stripe webhooks, follow these steps:
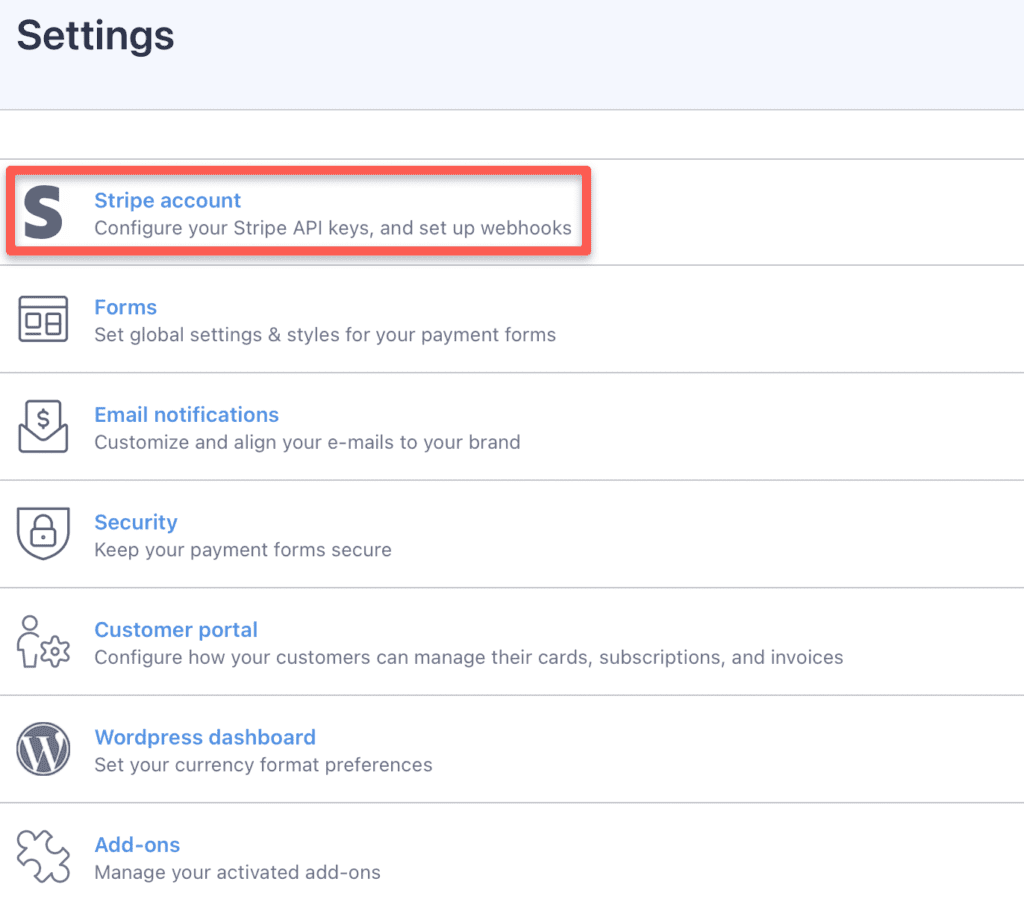
Step 1. Navigate to the “WP Full Pay → Settings → Stripe account” page in WP Full Pay:
Step 2. Copy the webhook endpoint to the clipboard from the “Webhooks” section:
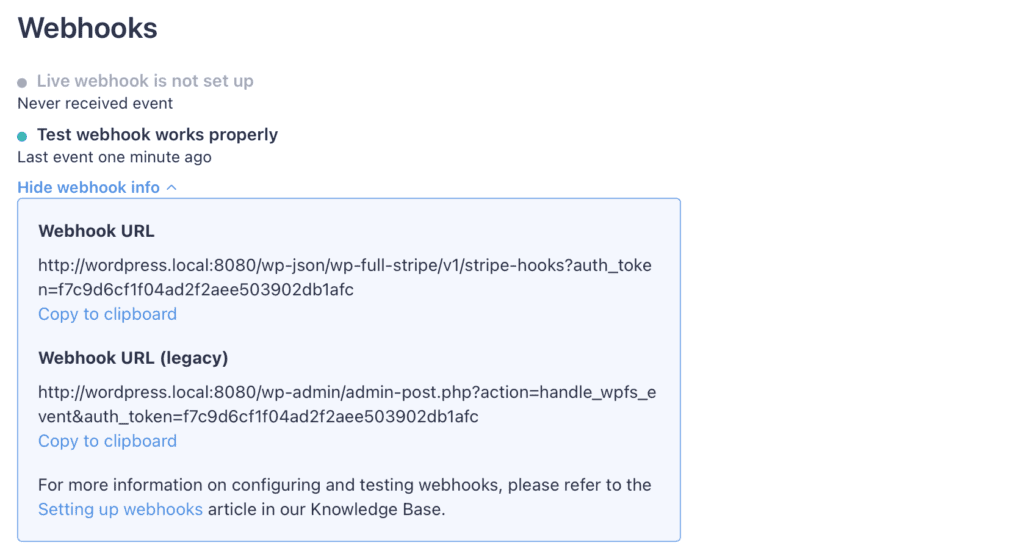
Here, you’ll find a “normal” and a “legacy” link. The legacy endpoint is available because it’s still used by thousands of websites. All new users are recommended to use the “normal” endpoint!
Step 3. Next, navigate to the “Developers → Webhooks” page on the Stripe Dashboard, and click the “Add endpoint” button:

Step 4. Configure the endpoint URL. Next, click the “Select events” button:
Select the following events:
- charge.captured
- charge.expired
- charge.failed
- charge.pending
- charge.refunded
- charge.updated
- charge.succeeded
- customer.subscription.deleted
- invoice.created
- invoice.payment_succeeded
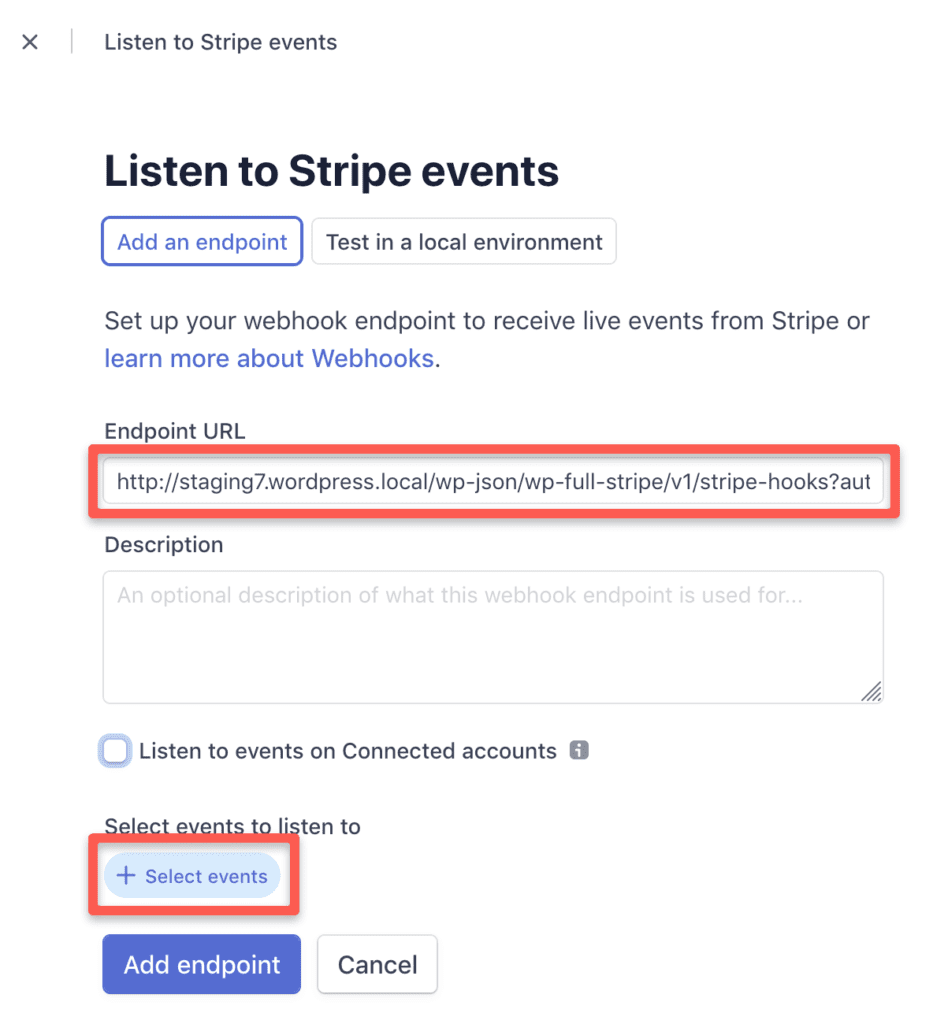
Step 5. Moving forward, search the required events, and click the “Add events” button. Once all the events are added, click the “Add endpoint” button.
Next, switch to live mode by clicking the “Test mode” toggle in the top-right corner:
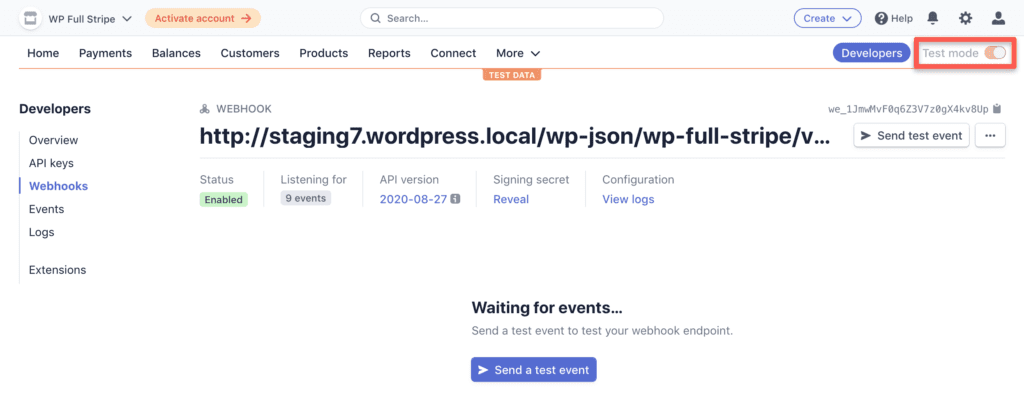
Repeat steps 3, 4, and 5 to configure your Stripe webhooks in live mode!
Due to website configuration issues, one or both endpoints may not work.
Possible causes can be:
- a firewall or security plugin blocking the endpoint;
- the website being hosted by a hosting provider that blocks the endpoint;
- the website using a service like Cloudflare which blocks the endpoint.
Learn how to troubleshoot Stripe webhook endpoints.
Stripe webhook events
Stripe webhook events are notifications sent by the Stripe payment platform to your server to inform you about events that occur in your Stripe account. These events can include various actions and updates related to payments, subscriptions, customers, disputes, and more.
When certain events happen within your Stripe account, such as a successful payment or a subscription renewal, Stripe will send a POST request to a URL specified by you, known as the webhook endpoint. This URL typically points to a server-side script or application that listens for incoming webhook events.
Some common webhook events in Stripe include:
| Event | Description |
|---|
| charge.succeeded | a payment was successfully processed |
| invoice.payment_failed | a payment for an invoice failed |
| customer.subscription.created | a customer subscribed to a plan |
| customer.subscription.updated | a subscription was updated |
| customer.subscription.deleted | subscription was canceled |
| dispute.created | a dispute was created for a charge |
| payout.created | a payout to your bank account was initiated |
These events allow you to automate various tasks and keep your system synchronized with changes happening in your Stripe account.Here are common events related to Stripe Checkout webhooks:
| Event | Description |
|---|
| checkout.session.completed | This event is sent when a customer successfully completes the checkout process and the payment is confirmed |
| checkout.session.async_payment_failed | Indicates that a payment attempt for a Checkout Session has failed |
| checkout.session.async_payment_succeeded | Indicates that a payment attempt for a Checkout Session has succeeded. |
| checkout.session.completed | Indicates that a customer has successfully completed the Checkout process. |
These events enable you to automate tasks such as updating order statuses, sending confirmation emails, or triggering other actions based on the outcome of the checkout process.Common subscription webhook events in Stripe include:
| Event | Description |
|---|
| customer.subscription.created | Sent when a new subscription is created for a customer. |
| customer.subscription.updated | Sent when a subscription is updated, such as changing the subscription plan or quantity. |
| customer.subscription.deleted | Sent when a subscription is canceled or expires. |
| invoice.created | Sent when a new invoice is created for a subscription. |
| invoice.payment_failed | Sent when a payment for an invoice fails. |
| invoice.payment_succeeded | Sent when a payment for an invoice succeeds. |
| invoice.updated | Sent when an invoice is updated, such as when a subscription change triggers a proration. |
| subscription_schedule.updated | Sent when changes are made to a subscription schedule, such as adding or removing phases. |
Wrap-up
Webhooks play a key role on the web, and it’s a safe bet to say they’ll become even more essential over the coming years! Stripe webhooks can enhance your business by creating a real-time interface between your website and the payment gateway Stripe. Contrary to APIs, Stripe webhooks allow your payment service provider to send instant notifications whenever an important event occurs. This enables you to move the needle on your online services, enhancing customer experience and improving sales!