Stripe Products and Prices give you a reusable model for what you sell and how you charge for it. That distinction matters when a WordPress payment form needs a stable amount, a recurring interval, or more than one currency. A Product describes the thing or service, while a Price stores the amount, currency options, and billing rules attached to it.
This guide explains the model, shows how to prepare one-time and recurring Prices, and walks through selecting them in WP Full Pay. WP Full Pay is the product covered by this site, so the walkthrough uses its current form editor. It focuses on setup decisions, not Stripe reporting or a complete subscription operations guide.
Product and Price are different Stripe objects
A Product is the catalog record. It can contain a name, description, images, tax code, and other information that helps identify what a customer is buying. A Product is not a warehouse item and does not by itself decide what a customer pays.
A Price is the charge definition connected to that product. It includes the amount, currency, and whether the charge is one-time or recurring. One product can have more than one price, which is useful for different currencies, billing frequencies, or customer-facing plans. Stripe explains this relationship in its current Products and Prices overview.
- Product: what the offer is.
- Price: how much and how often the customer pays.
- Payment form: where the customer selects or confirms that price.
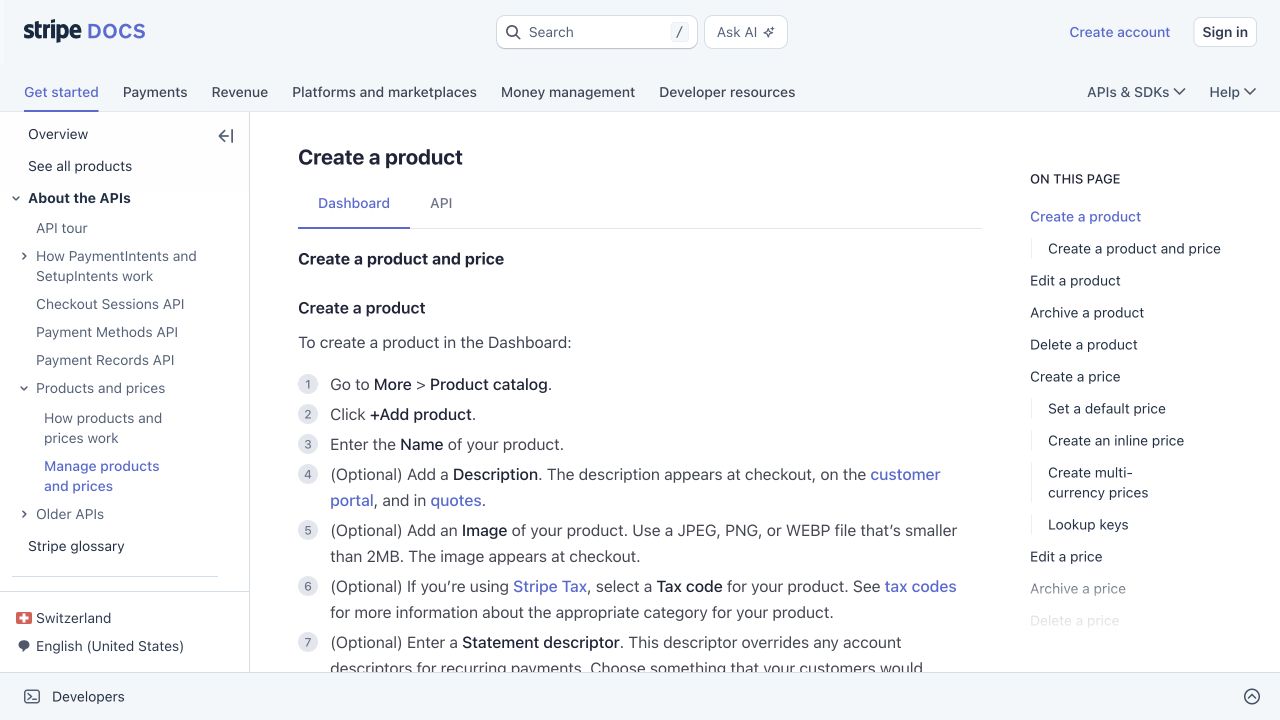 Stripe’s current official guide directs Dashboard users to More → Product catalog → Add product.
Choose one-time or recurring pricing
Use a one-time Price when the customer should be charged once. Common examples include a downloadable resource, a consultation, an event ticket, a fixed service, or a single donation. The payment can still have a confirmation flow and receipt. One-time means that Stripe does not schedule another charge from that Price.
Use a recurring Price when the customer should be billed on a schedule. Monthly and yearly plans are familiar choices, but Stripe supports other intervals where the account and configured form support them. A recurring Price is the billing foundation for a subscription. It is not the same thing as a membership, a content restriction, or a promise that every future payment will succeed.
Keep the customer promise visible in the product and price names. For example, “Supporter” is a useful product name, while “Supporter, monthly” and “Supporter, annual” can identify separate recurring prices. Clear naming helps the person building the WordPress form select the correct option later.
Create a one-time Price
- In the Stripe Dashboard, open More → Product catalog and select Add product, or open an existing Product.
- Add the product name and description that should appear in your internal catalog or checkout flow.
- Choose a one-time pricing model.
- Set the amount and default currency, add any supported currencies needed for this Price, then review each value carefully.
- Save the Price and record its identifier in your implementation notes.
Create a recurring Price
- Open the product that represents the plan or service.
- Add a new Price and choose recurring billing.
- Select the interval and interval count that match the offer.
- Set the amount and currency, then confirm whether the form needs a trial, setup fee, coupon, or customer portal.
- Save the Price and keep its identifier with the plan name and billing explanation.
💡 A recurring Price defines the billing schedule, but it does not replace the rest of your subscription workflow. Review the current WP Full Pay subscription form guide before you add trials, plan choices, or customer self-service.
Know which Price fields can change later
A Price’s amount, default currency, billing model, and recurring interval are part of the offer identity rather than ordinary edit fields. Stripe does not let you change an existing Price’s amount, and tax behavior cannot change after it is set to inclusive or exclusive. Create a new Price when the amount, default currency, one-time or recurring model, interval, or established tax behavior needs to change, then move new purchases to that Price.
Another currency does not always require another Price. Stripe supports multi-currency Prices, and an existing single-currency Price can gain additional currencies in the Dashboard. Stripe Checkout can then use a supported local currency automatically. A separate Price is still useful when you need a different default currency, amount version, billing interval, reporting boundary, or Price ID. Stripe documents both multi-currency setup and the rules for updating and archiving Prices.
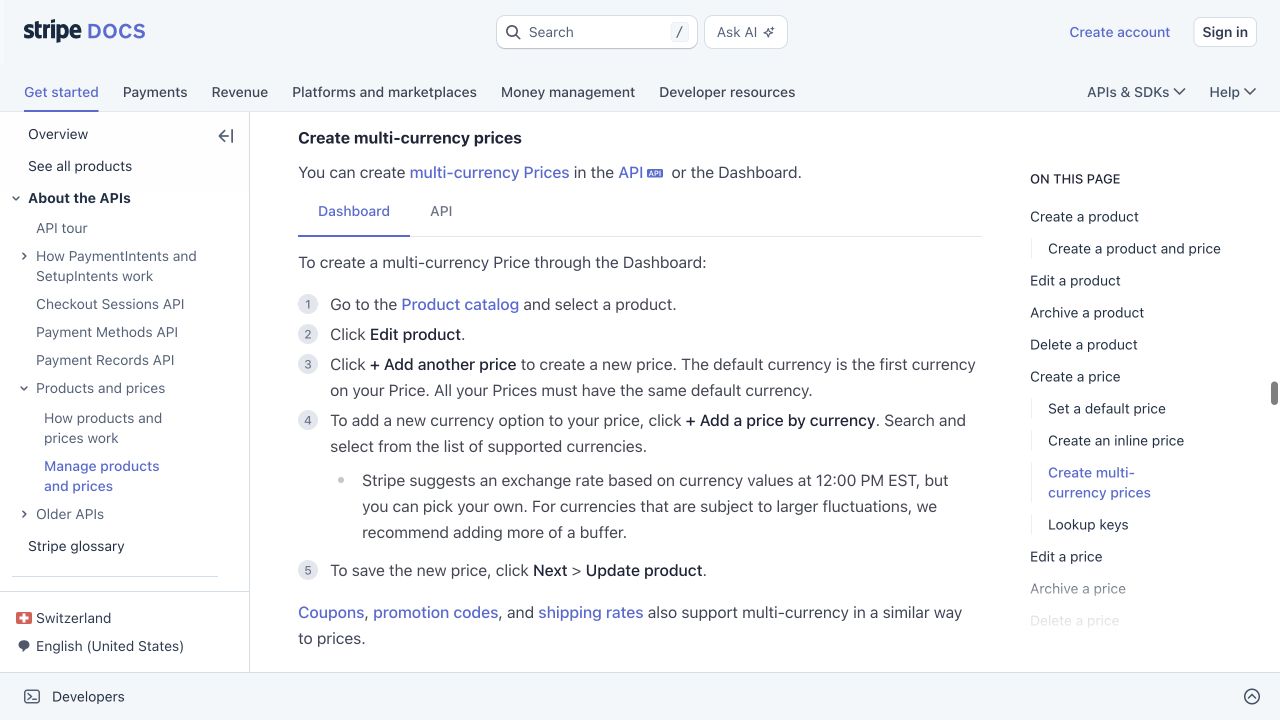 Stripe’s current guide documents Add another price and Add a price by currency in the Product catalog.
- Need another supported currency: add it to a multi-currency Price when that matches the checkout flow.
- Need another billing interval: create another recurring Price.
- Need a new amount or tax treatment: create a new Price, then stop presenting the old one.
- Need a corrected or retired offer: archive the old Price when appropriate.
- Need an audit trail: record the Product ID, Price ID, amount, currency, interval, and intended form.
Archiving is a safer choice than silently changing an offer that has already been used. It keeps historical transactions understandable while preventing the retired option from being selected for new checkouts. Before archiving, check every payment form, link, automation, and customer communication that references the Price.
Select the Product and Price in WP Full Pay
Once the Stripe Product and Price are ready in test mode, open the matching WP Full Pay form. The current documented paths are different for the two form types:
- One-time: open Full Pay → Payment Forms, create or edit a one-time form, then use Payment & Tax → Add products from Stripe.
- Recurring: open Full Pay → Forms, create or edit a subscription form, then use Payment & Tax → Add plan from Stripe.
- Confirm that WP Full Pay and the Stripe Dashboard are both in test mode.
- Open the documented form screen for the Price type and create or edit the form.
- Use the exact add button for that form, then choose the intended Product and Price.
- Confirm the amount, currency, interval, and displayed plan name before saving.
- Configure the form layout, confirmation behavior, payment methods, taxes, and any documented customer fields.
- Save the form, place it on a test page, and run a test transaction in Stripe test mode.
- Check the resulting Payment or Subscription in Stripe before preparing the live copy.
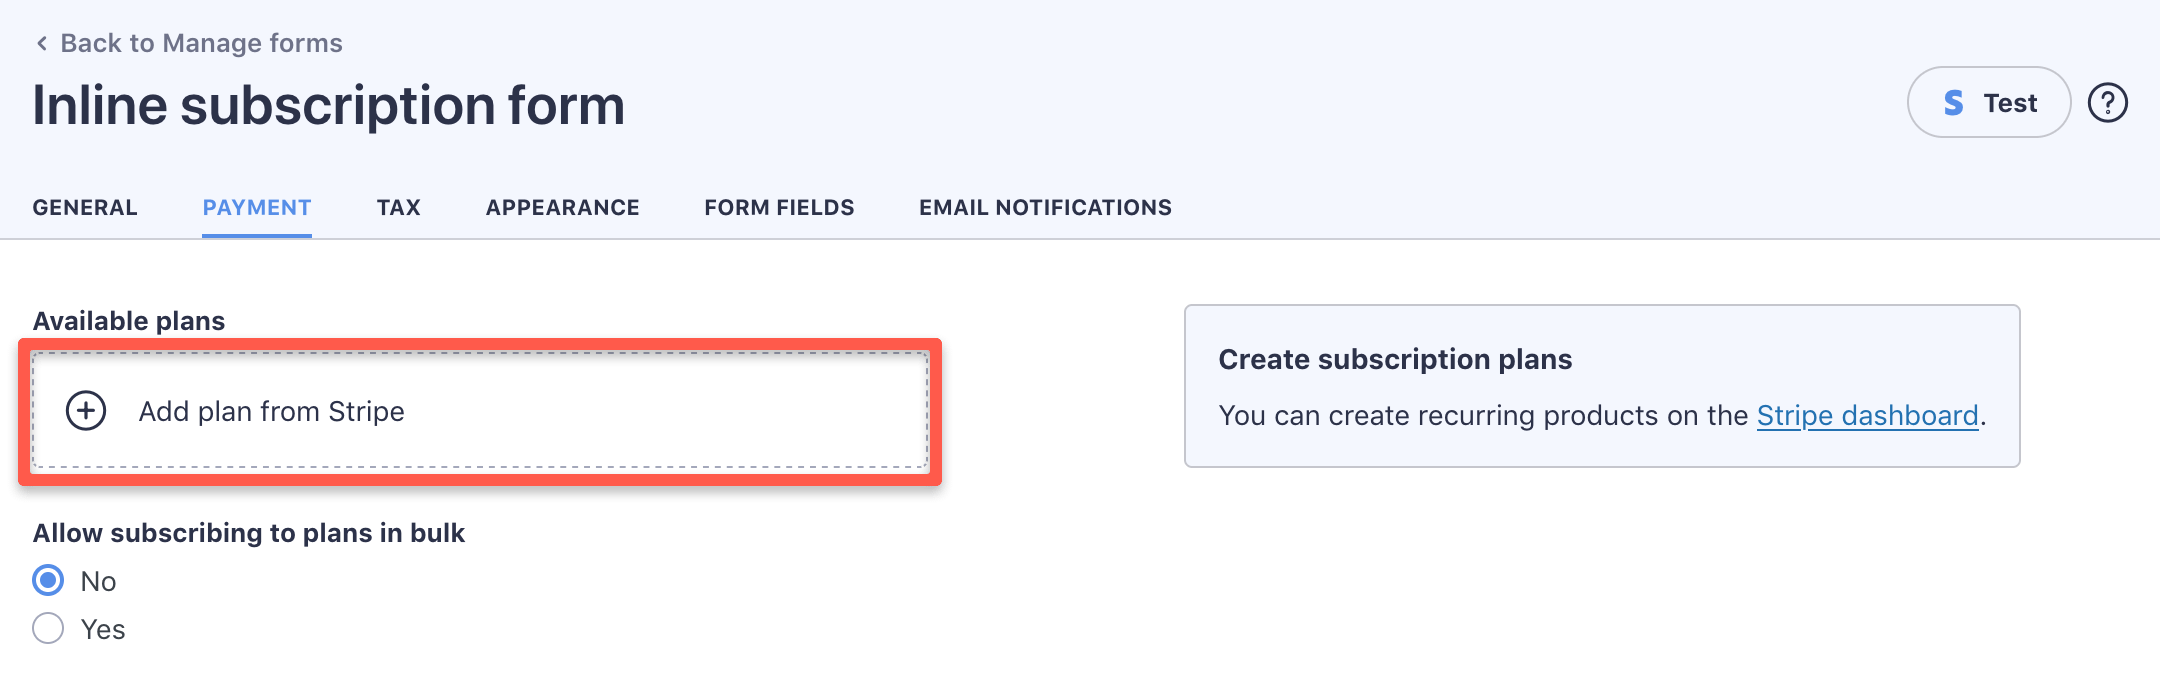 The current official WP Full Pay capture shows the subscription form’s Add plan from Stripe control.
Do not paste a Product name where the form expects a Price. The name helps you identify the offer, but the Price carries the amount and billing schedule. If a selector shows multiple Prices, compare the currency and interval rather than choosing the first matching label.
You can download WP Full Pay for free, connect the appropriate Stripe mode, and build a payment form around the Product and Price you have already tested.
Test the complete path before launch
A successful Product setup is only the beginning. Preview the form as a customer, confirm that the selected currency and amount are clear, and verify that a recurring form explains its interval. Test the confirmation page, receipt behavior, and any webhook or automation that depends on a successful transaction.
For recurring offers, check the first invoice and the subscription status in Stripe test mode. For one-time offers, confirm that the payment record points to the intended Product and Price. Also check that a retired Price is not still exposed in an older form or page.
When the test setup is correct, open the Product details page in Stripe and use Copy to live mode. Stripe copies the associated Prices, but the result is a separate live Product. Later changes to the sandbox Product do not update an existing live copy, and copying the same sandbox Product again creates another live Product.
Switch WP Full Pay to live mode only after that copy exists. For subscriptions, the current live-mode instructions require re-adding the plans on the form’s Payment & Tax tab. Verify the live Product and Price IDs, save the live configuration, embed the correct shortcode if a separate form copy is used, and make a permitted live-mode check before sending customers to the page.
When the model is correct, the WordPress form becomes easier to maintain. Products describe the offers, Prices describe the charge rules, and WP Full Pay presents the selected option to the customer. Keep those responsibilities separate as you add plans, currencies, or new payment pages.
Frequently asked questions
Can one Product have multiple Prices?
Yes. Multiple Prices can represent different amounts, default currencies, or recurring intervals for the same underlying offer. A single Price can also support multiple currencies. Give every Price a clear nickname or description so the person configuring the form can distinguish it.
Can a one-time Price become recurring?
Plan on creating a separate Price for a different billing model. A recurring schedule changes the customer promise and should be reviewed as a new offer, with a separate test and form configuration.
Where is payment reporting covered?
Use the dedicated guide to Stripe reports and reconciliation for exports and operational review. For recurring implementation details, continue with the guide to accepting recurring payments in WordPress.