Growing and scaling without adding tax pain? What if we said there’s an automated sales tax tool that tells you where you need to collect taxes, calculates and collects the right amount of sales tax, VAT, and GST wherever you sell, and creates comprehensive reports to make filing taxes a breeze?
Well, this is exactly what Stripe Tax does!
In this post, we’ll show you how this indirect tax compliance tool works to help you get started!
Indirect tax compliance is one of the most painful distractions online businesses have to deal with today.
You need to understand when and where your business has tax obligations, how much taxes you have to collect, and how to file and remit these taxes to avoid hefty penalties and damaged customer trust.
Today, digital and physical goods are taxed in over 130 countries, and there are over 11,000 different tax jurisdictions in the US alone! On top of that, tax rules in each jurisdiction are updated frequently and often vary based on subtle details.
Just a few interesting examples:
- SaaS sales are 100% taxable in New York, 80% in Texas, and non-taxable in California.
- Hiking boots are taxed in Texas but cowboy boots aren’t.
- In the UK, you only have to pay VAT for animal food if you buy it for your pet.
As you can see, the more products you sell and the more locations you sell into, the more challenging indirect tax compliance becomes.
Unsurprisingly, 49% of businesses that collect taxes find it difficult to keep up with tax obligations, and 59% turn to third parties, often at significant expense.

Is there a better way out?
As magical as it may sound, Stripe Tax makes every aspect of international tax compliance frictionless.
This automated sales tax tool is an integration of the payment service provider Stripe. It automates the calculation and collection of the right amount of sales tax, VAT, and GST on both physical and digital goods and services in all US states and more than 40 countries.
Furthermore, it tells you where and when you need to collect taxes, and creates comprehensive reports to make filing returns easy.
The best part?
It’s natively built into Stripe, meaning, you can get started in the blink of an eye!
Stripe Tax guides you through all the three steps of indirect tax compliance, namely:
- dentifying where and when you have tax obligations;
- calculating and collecting the right amount of tax; and
- filing and remitting taxes.
Let’s see these steps in detail!
1) Know where to register
Stripe’s automated sales tax integration monitors your Stripe transactions and tells you when and where you have potential tax registration obligations.
You can see how your Stripe transactions compare to tax filing thresholds on the ”Monitoring” tab of the Stripe Dashboard:

There are three categories to watch out for:
- Exceeded: Your estimated transactions exceeded the location’s threshold, and your business likely needs to register for tax.
- To monitor: You have customers in these locations, but you haven’t exceeded the threshold yet. Stripe Tax will provide a percent-to-threshold to help you determine when you might need to register.
- Unattributed revenue: in some cases, Stripe’s automated sales tax tool might not be able to determine the location for a transaction. You’ll find these items in this category.
If you want to check the threshold and your latest sales in a given state or country, just click the “Review” button next to the selected location.
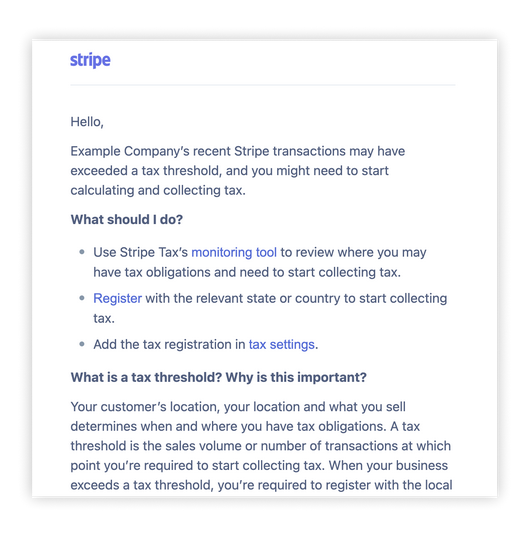
To make your life even easier, Stripe Tax will send you email and Dashboard notifications each time you hit a registration threshold in any location you sell:
When you register to collect tax in a jurisdiction, make sure to use the “Registrations” tab of the Dashboard to add the registration to Stripe Tax.
Stripe’s automated sales tax tool supports both country and VAT OSS registrations in Europe, and country and provincial registrations in Canada.
2) Automatically calculate and collect taxes
Stripe’s automated sales tax tool supports tax collection on hundreds of products and services and constantly monitors and updates tax rules and rates.
By determining your buyer’s precise location and matching that to the product or service being sold, it will always calculate and collect the right amount of tax, no matter where you sell.
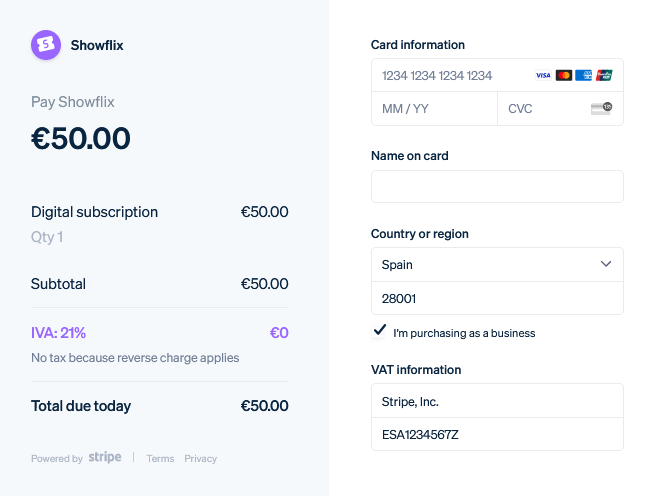
Stripe Tax even allows you to reduce checkout friction by using location information to calculate and show taxes in the most familiar way to your customers – either included in the total or as a separate line item.
It also helps you collect the tax identification number from B2B customers. Furthermore, it will automatically validate VAT IDs and ABNs for European and Australian customers, applying a reverse charge or zero VAT rate when necessary:
3) File and remit with ease
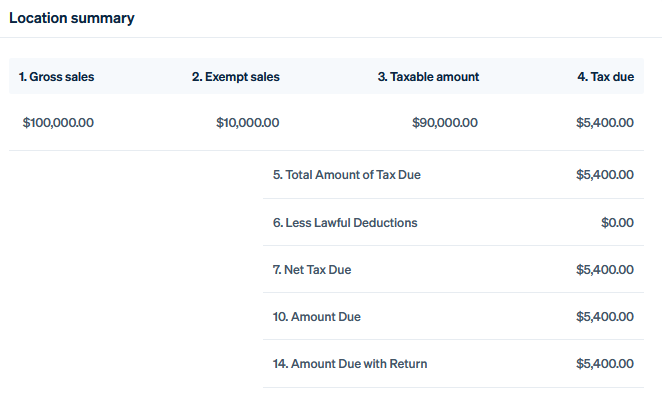
Finally, Stripe’s automated sales tax calculator also lends you a helping hand when it comes to filing and remitting the collected taxes.
How?
It provides you with comprehensive reports that match formatting requirements for each filing location so you can easily file and remit taxes on your own, with an accountant, or with one of Stripe’s filing partners (TaxJar in the US and Taxually or Marosa in Europe)
How much does Stripe Tax cost?
Now, you might be wondering: how much does this brilliant solution cost?
Well, in the case of low-code or no-code integrations, Stripe Tax costs as little as 0.5% per transaction where you’re registered to collect taxes. This price even drops to 0.4% per transaction when you process more than 100,000 USD per month.
You can also integrate this automated sales tax tool with custom checkout or payment flows. In this case, pricing for Stripe Tax API starts at 0.50 USD per transaction where you’re registered to collect taxes.
If you have a unique business model, large payment volume, or high-value transactions, you can ask Stripe for a custom pricing plan. To learn more about your options, visit Stripe Tax’s pricing page.
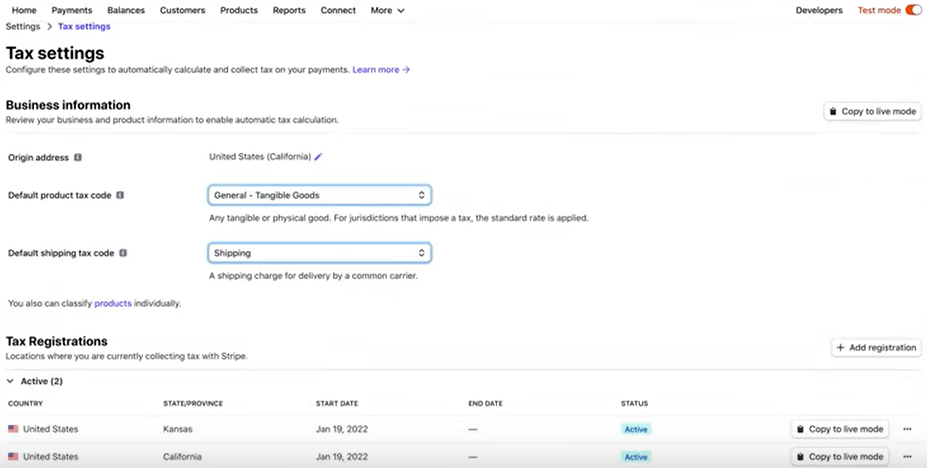
Configuring your tax settings is simple:
Step 1. Make sure to confirm the origin address of your business in the Stripe Dashboard.
Step 2. Select a default tax category for the goods or services you sell.
Don’t forget to add all your active tax registrations.
Step 3. Enable Stripe Tax with the click of a button in your Stripe Dashboard, by adding a single line of code to your existing integration, or with Stripe’s powerful API.
If you’re using one of Stripe’s no-code products (such as Payments, Billing, Checkout, Connect, Invoicing, or Payment Links), automated sales tax calculation will be enabled by default:

How to automate taxes for Stripe payments in WordPress?
If you want to collect taxes in WordPress for Stripe payments, the easiest way is to use the plugin WP Full Pay.
It’s one of the most reliable and secure WP Stripe plugins that lets you accept one-time and recurring payments in less than 30 minutes – no coding skills required!
It supports Stripe’s automated sales tax features in one-time payment forms and subscription forms as well. Both inline and checkout form layouts are supported.
WP Full Pay shows the gross price and automatically updates it in the price selector of the form based on user choices (country, state, tax ID, coupon). Tax is automatically calculated and is shown in the “Payment details” section of your forms.
WP Full Pay also allows you to collect taxes exclusively (price is specified as the net price) or inclusively (price is specified as the gross price). Furthermore, it enables you to collect data such as business name, tax ID type, and tax ID for B2B purchases.
Placeholder tokens, such as gross amount, net amount, tax amount, and discount amount, are also calculated properly so that you can personalize your email receipts, thank you pages, and payment descriptions.
Configuration of Stripe Tax in WP Full Pay
Stripe Tax can be enabled on the “Tax” tab of the given form in WP Full Pay:
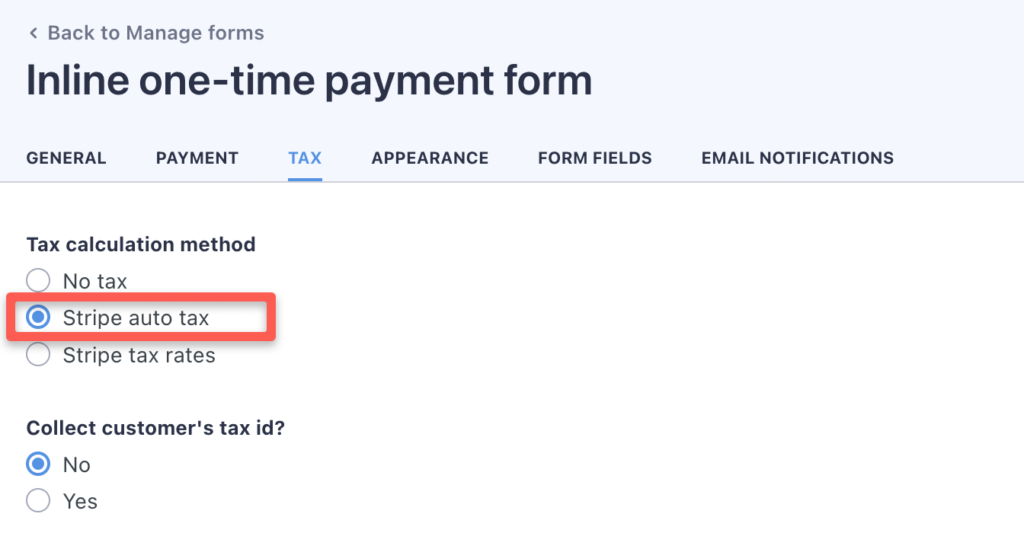
If you sell to consumers (B2C), that’s all you have to do!
In the case of B2B transactions, WP Full Pay allows you to collect your customer’s tax ID:
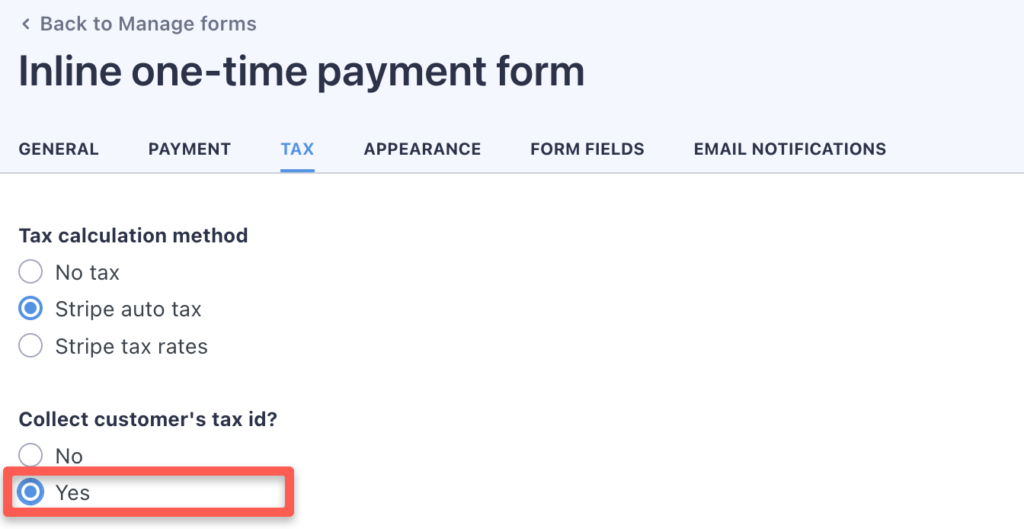
In the case of inline forms, Stripe Tax requires at least the buyer’s country to determine the right tax amount. If the selected country is the US or Canada, the postal code needs to be provided as well:
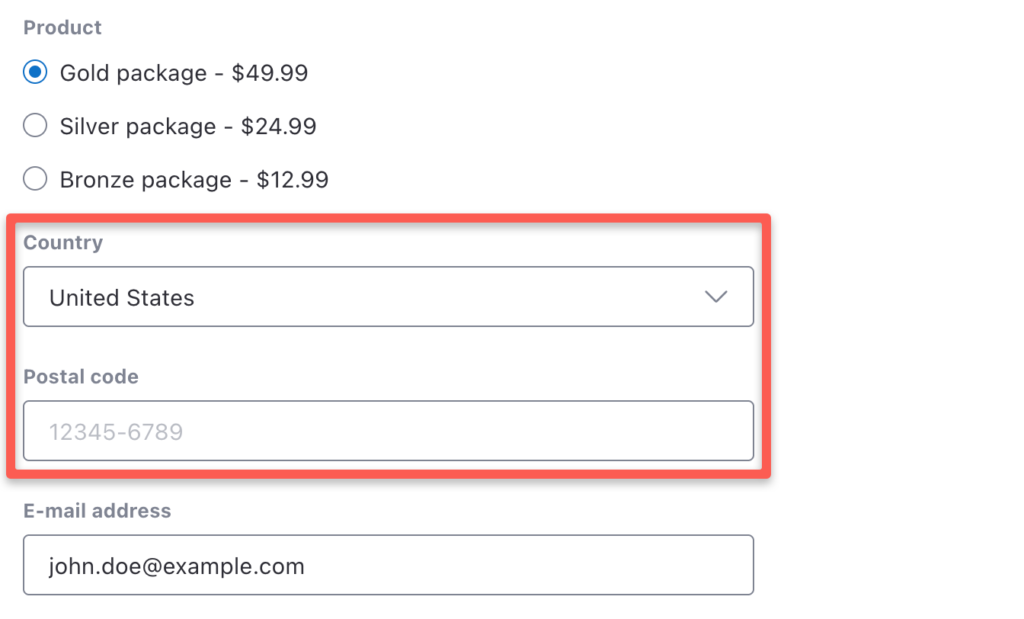
When tax ID collection is enabled, the inline form collects your buyer’s business name, tax ID type, and tax ID as well:
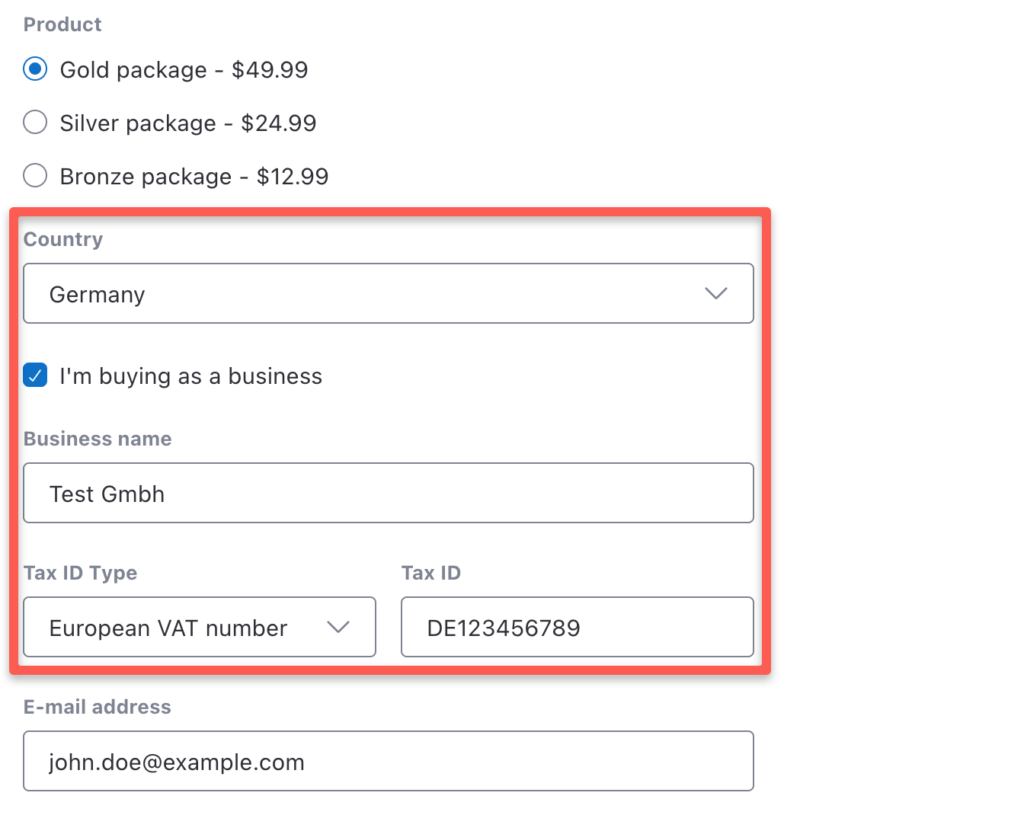
If billing address collection is enabled, the billing country and the state of the billing address are used for tax calculation.
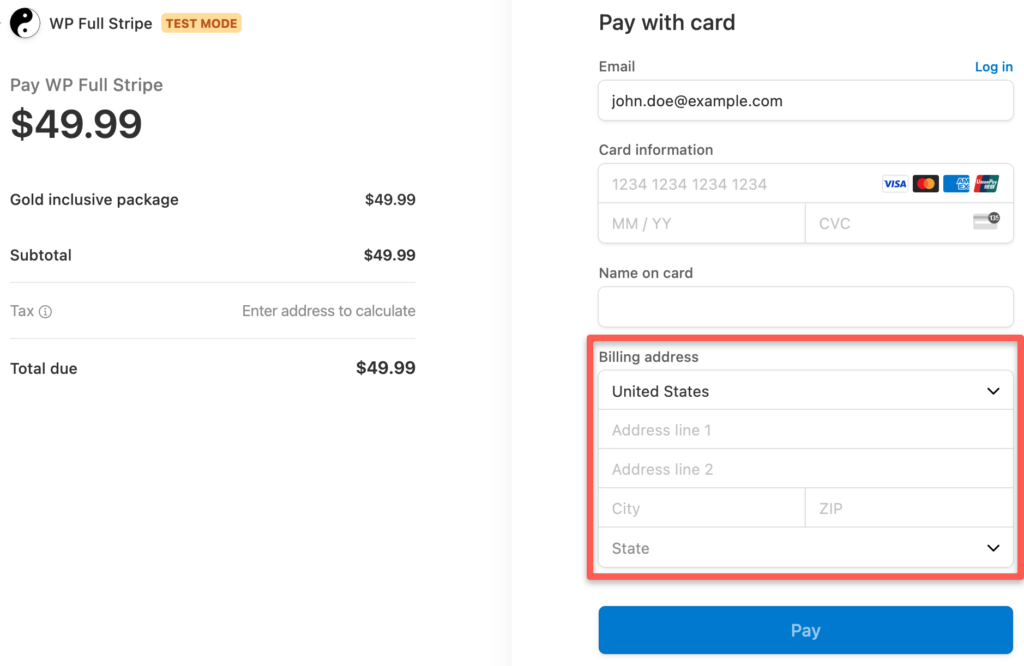
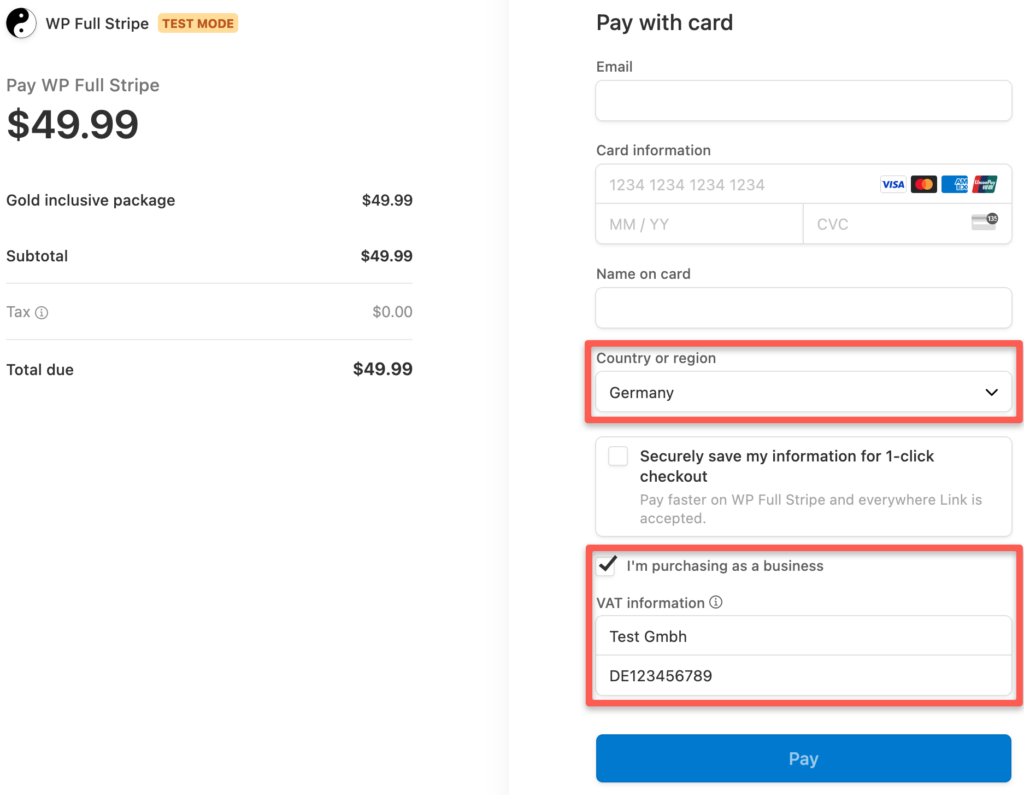
Checkout forms work in a similar way: Stripe Tax requires at least the buyer’s country to determine the right tax amount. If the selected country is the US or Canada, the exact address needs to be entered:
When tax ID collection is enabled, the checkout form collects your buyer’s business name and tax ID:
If billing address collection is enabled, the billing address is used for tax calculations.
Stripe Tax in a nutshell
While it’s easier than ever to reach buyers online, selling in more locations can make indirect tax compliance a pain in the neck.
Fortunately, Stripe’s automated sales tax tool saves you countless hours by simplifying the process. It automates the calculation and collection of the right amount of sales tax, VAT, and GST wherever you sell, tells you where and when you need to collect taxes, and creates comprehensive reports to make filing returns a breeze. So you have more time to focus on stuff that really matters – be that fine-tuning your products or services, building customer trust, or just spending time with the people you love.