Consumer’s payment preferences can vary significantly across different regions and cultures. For this, it’s super important for businesses, especially in the international market having flexible payment plans and options.
Payment plans allow customers to pay for products or services over time, rather than upfront. They make high-cost items more affordable and can improve cash flow for businesses.
Flexible payment plans can include everything from installment plans to subscriptions and pay-what-you-want pricing.
If you’re running a WordPress site, setting up payment plans can significantly improve your customer’s payment experience.
What is a payment plan?
A payment plan breaks down the total cost of a purchase into smaller, more manageable parts, allowing customers to pay over time. This can be a game-changer for both businesses and customers, making products and services more accessible while boosting sales and customer loyalty for businesses.
Payment plans can vary, but they generally allow customers to spread the cost of a purchase over several months. This approach is often referred to as “buy now, pay later,” where the customer receives the product immediately but pays in increments.
When you decide to offer payment plans, you’re giving your customers flexibility and allowing them to manage their finances better. It’s about making it easier for them to say yes to your products without the immediate financial burden.
Types of payment plans
Type A: Recurring plan
You can offer subscriptions, memberships, or installments using the recurring plan. Customers’ credit card will be charged automatically using Stripe with an interval set by you. Let’s say that you collected the payment information from a customer and received authorization to charge them $100 at the end of every month for the indefinite future like for a magazine subscription.
Type B: One-time payment plan
You can set up one-time payment plan on your WordPress site without the need to install WooCommerce. Like PayPal, Stripe also allows you to create a hosted payment page. A one-time payment plan requires a single payment to complete a purchase. It’s best suited for transactions that don’t require ongoing billing or future payments. Using a payment form on check-out is like you use a PayPal button, which collects the amount right on the spot.
Type C: Payment Plan (Installments)
Installment Plans allow customers to pay for a product or service in fixed amounts over a set period.
Example: a customer can pay $100 per month for ten months for a $1,000 product.
Type D: Buy now, Pay Later
Buy Now, Pay Later payments are often in a series of interest-free installments.
Many BNPL plans do not charge interest, this in turn makes this payment method cost-effective option for managing finances.
According to C+R Research, here are the top reasons why customers love the BNPL payment method, which provides a compelling reason for you to offer this payment plan to your customers.
Popular BNPL providers for Stripe
- Afterpay: Allows customers to split their purchase into four interest-free bi-weekly payments.
- Klarna: Offers various options including Pay in 4, monthly financing, and Pay Later, which lets customers pay within 30 days.
Jump to how to enable Afterpay or Klarna in Stripe payment forms.
Buy Now, Pay Later VS payment in installments
BNPL (Buy Now, Pay Later) and installment payments might seem similar, but they have key differences. Both allow customers to pay over time, but they suit different needs. Let’s explore each one and see how you can use them on your WordPress site.
Buy Now, Pay Later: BNPL programs let customers take home a product immediately and pay for it in scheduled portions of the total cost, without any interest. BNPL requires no formal loan from a bank or credit check, making it easy for consumers to get goods or services without an upfront payment. Stripe offers BNPL solutions that integrate with platforms like WordPress, allowing you to offer this option without WooCommerce.
Installment payments: Installment payments also involve multiple payments over a set period, but they often come from the customer’s credit card. That means before every charge, the store owner needs to verify payment details and get authorization from the customers. Installments can include interest or fees, depending on the terms set by the seller or financial institution.
Key differences
- Duration:
- BNPL: Short-term, usually paid off in a few weeks to a few months.
- Installments: Can be short-term or long-term, often extending to several months or years.
- Interest:
- BNPL: Generally interest-free if payments are made on time.
- Installments: May include interest, especially for longer-term plans.
- First payment:
- BNPL: Often requires an initial payment at the time of purchase.
- Installments: Terms vary, but may not require an upfront payment.
While both BNPL and payment in installments offer flexible payment options, BNPL is typically a short-term, interest-free solution, whereas installment plans can be longer-term and may include interest.
Overview: Afterpay and Klarna payment methods
Afterpay (Clearpay) and Klarna offer flexible payment options that cater to various customer needs.
Klarna provides multiple payment methods, including Pay in 3 or 4, allowing customers to split their purchase into interest-free installments. It also offers monthly financing for up to 36 months with potential interest, and options to Pay Later within 30 days or Pay Now immediately.
Source: Stripe Docs
On the other hand, Afterpay / Clearpay payment options focuses on simplicity with its Pay in 4 plan, where customers pay in four interest-free bi-weekly installments over six weeks. In the US, Afterpay also offers monthly installments for 6 or 12 months with capped interest.
Source: Stripe Docs
Both services ensure merchants receive the full amount upfront from Stripe, while they handle the installment collections, enhancing cash flow and customer satisfaction.
How to set up payment plans on WordPress?
If you sell products on WordPress without WooCommerce and utilize Stripe for transactions, you can enable Klarna or Afterpay for your payment forms to offer flexible payment options to your customers.
Read more about payment methods supported by Stripe.
This way, you make your products or services more accessible in terms of cost and allow your customers to choose from various payment plans, making it easier and more convenient for them to purchase from you.
Setting up payment plans on your WordPress site with Stripe involves a few steps:
1. Configure Stripe for your WordPress site
To connect Stripe and WordPress, you need to install a corresponding plugin like WP Full Pay for handling payment processing on WordPress. WP Full Pay allows you to connect Stripe with your WordPress site, create order forms with payment buttons and offer payment plans.
Learn how to configure Stripe to your WordPress site.
NOTE: You no longer need to manually add Stripe API keys with WP Full Pay version 7.0 and later. Stripe Connect makes the integration process easy and allows you to connect your Stripe account directly through the WP Full Pay.
2. Enable Klarna or Afterpay on Stripe dashboard
To offer flexible payment options to your customers, you need to enable Klarna or Afterpay on your Stripe dashboard. This will allow you to set up payment plans for your products or services.
By integrating Klarna or Afterpay, you provide your customers with the option to pay in installments, which can significantly enhance their purchasing experience.
Here’s how to enable Klarna or Afterpay:
- Log in to your Stripe account: Access your Stripe dashboard with your credentials.
- Navigate to payment methods: Go to the ‘Settings’ section and select ‘Payment Methods.’
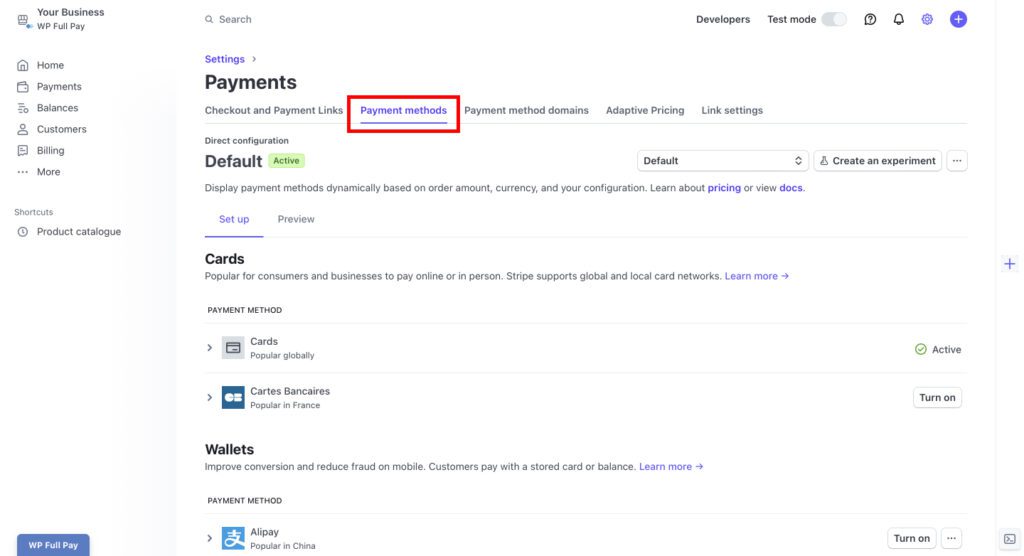
3. Enable Klarna or Afterpay: Find Klarna and Afterpay / Clearpay under the ‘Buy now, pay later’ section. Next, hit the ‘Turn on’ button.

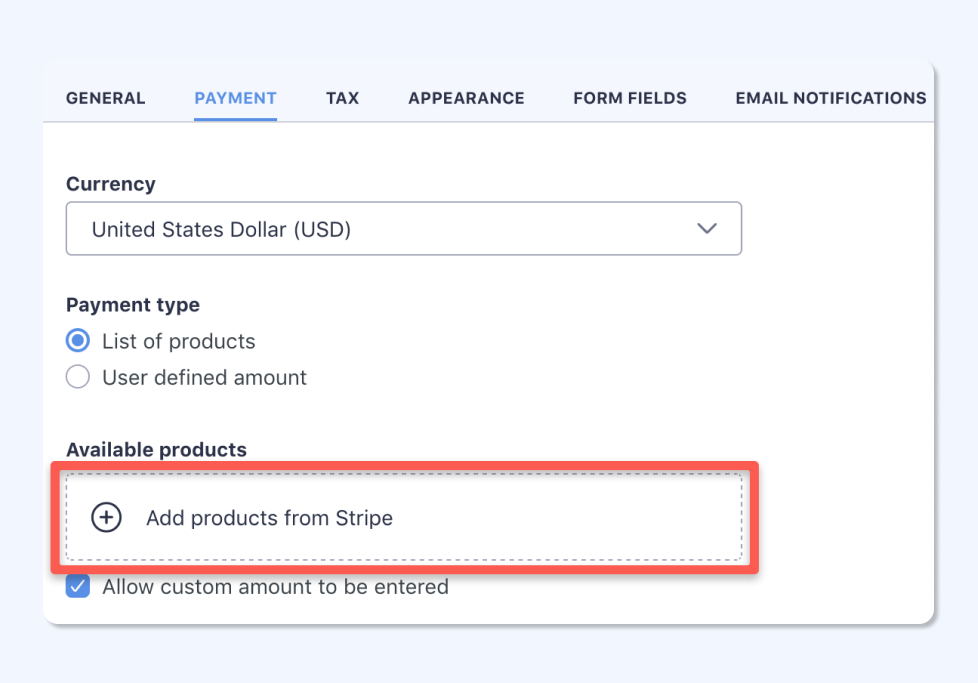
3. Create Stripe products
When setting up payment plans, you need to create Stripe products, which can either be for recurring payments or one-time purchases. Later, you will use these products to generate payment forms on your WordPress site, allowing you to offer various payment options to your customers.
Here’s how to create Stripe products:
- Log in to your Stripe dashboard.
- In the Stripe dashboard, find and click on the ‘Products’ section.
- Create a new product:
- For recurring payments: If you want to offer subscription-based services or products, set up a recurring payment product. Specify the billing interval (e.g., monthly, yearly) and the price for each billing cycle.
- For one-time payments: If you prefer to offer a product or service for a one-time fee, create a one-time payment product. Set the price and any other relevant details.
- Add product details, including the name, description, and pricing.
- Once all details are filled in, save the product in your Stripe account.
After creating the necessary products in Stripe, you can proceed to integrate these products into payment forms on your WordPress site.
Learn how to create Stripe products with visuals.
4. Embed Stripe payment plans into your WordPress posts or pages
Ensure WP Full Pay is installed and configured on your WordPress site to facilitate the integration with Stripe.
Moving forward, follow these steps to add payment plans to your WordPress site:
- Create payment forms: Using WP Full Pay, create Stripe payment forms and add corresponding to the Stripe products you’ve set up. This includes forms for both recurring and one-time payments.
- Add forms to your site: Embed these payment forms on relevant pages of your WordPress site.
For this, copy the shortcode of the payment form.
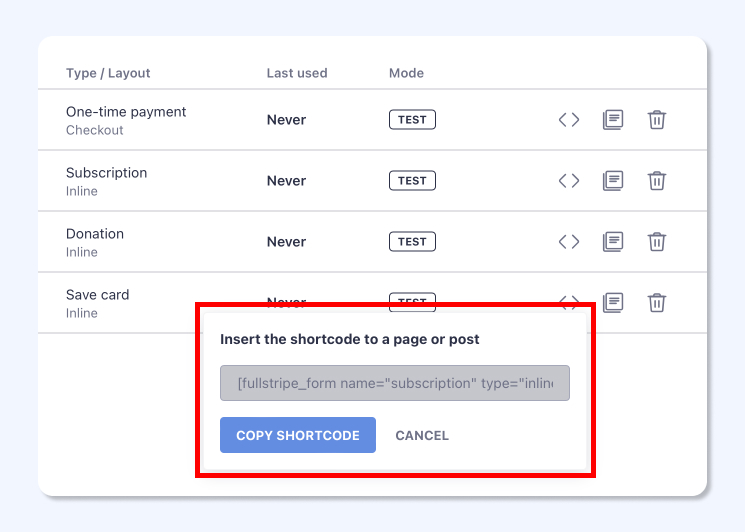
Next, paste the shortcode to page or post.

By following these steps, you will offer payment plans on your WordPress pages or posts.
You can download WP Full Pay plugin for free, create the forms with Afterpay or Klarna enabled, and test Stripe transactions on your WordPress site.