When you’re using WooCommerce with WordPress CMS, it comes with payment gateways, including Stripe. This allows you to accept online payments on your WooCommerce store.
When you want to sell a service or product on your WordPress site, or you want to create pricing plans for your SaaS business, there is no payment gateway integrated.
The question may arise: How can I accept payments on the WordPress site? Or, I have a Stripe account, can I use Stripe for WordPress?
And, the answer is: absolutely! Stripe can integrate with WordPress.
Table of contents:
How does Stripe integration with WordPress work?
Integrating Stripe to a WordPress site focuses on online payment acceptance without the additional eCommerce functionalities like in WooCommerce. Meaning, you simply create Stripe products on your Stripe dashboard, then embed the Stripe payment forms to WordPress pages.
There are 2 ways you can set up Stripe for a WordPress site:
- By integrating Stripe’s API directly into your site. This option requires some coding skills or working with WordPress development services.
- Adding a payment form to a WordPress site using a Stripe payment plugin like WP Full Pay.
The process of using WP Full Pay for accepting Stripe payments goes like this:
- You create a Stripe product (one-time or recurring payment product) on your Stripe dashboard.
- Next, you create a payment form on the WP Full Pay dashboard on WordPress admin. Then, you add the Stripe products you created to the payment form.
- Moving on, you embed the payment form on a desired content on your WordPress site where you want transactions to happen.
- When a customer makes a purchase on your site or subscribes to a pricing plan, they are directed to a Stripe hosted checkout page. Here, they can review their order and enter their payment information. Alternatively, they can complete the checkout on your site page with on-site checkout form layouts.
- Once the customer submits their payment information, Stripe processes the payment in the background.
- After the payment is processed successfully, the customer is redirected to a confirmation page on your site, indicating that their payment was successful. This thank you page is created by you on your WordPress admin panel.
- Moving forward, you can view recent transactions on your WordPress admin by navigating to WP Full Pay → Transactions. And, on your Stripe dashboard, you can view payment details, manage payments, chargebacks, invoices, and generate reports.
📖 You might also like to read Invoice vs Payment Forms: What’s the Difference?
How to integrate Stripe to a WordPress site?
Here are the steps needed to use Stripe for WordPress:
- Create a Stripe account
- Install WP Full Pay plugin
- Create Stripe products
- Embed Stripe product to a WordPress page
Step 1: Create a Stripe account
The first step to integrate Stripe to a WordPress, you need to create a Stripe account.
To create a Stripe account, follow these steps:
- Go to the Stripe homepage (stripe.com) and click on the “Sign in” or “Sign up” button to register.
- Enter your email address and create a password. This will be your login credentials for accessing your Stripe dashboard.
- Verify your email and set up your account. Once your email is verified, you’ll need to provide additional details about your business. This includes your business name, the type of business, address, and the website if you have one.
- Enter your bank account details where Stripe will deposit your payments. This step is crucial as it links your Stripe account to your bank for fund transfers.
- Depending on your location and the nature of your business, Stripe might require additional documentation to verify your identity and business. This can include uploading government-issued IDs or business registration documents.
- After entering all required information and completing any necessary verifications, you’ll need to submit the information for review. Stripe will usually activate your account quickly, often instantly, unless further review is required.
What should I do if Stripe is not available in my country?
If you live in a country where Stripe is not available yet, there’s still a way to create an account.
To do that, you can form an US LLC as a non-resident.
Yes, this is entirely legal.
Forming a US company will allow you to have a business presence in the US, and it allows you to create a US Stripe account. Once you have the stripe account, you can use WP Full Pay and integrate it with your WordPress website.
Refer Stripe documentation for more details on getting started with Stripe.
Step 2: Install WP Full Pay to connect Stripe to WordPress
Once your Stripe account is set up, the next step is to install the WP Full Pay plugin to integrate Stripe into your WordPress pages.
WP Full Pay allows you to create different types of Stripe payment forms within your WP dashboard.
NOTE: With WP Full Pay version 7.0 and later, you no longer need to manually add Stripe API keys. Stripe Connect makes the integration process easy and allows you to connect your Stripe account directly through the WP Full Pay.
WP Full Pay is a no-code Stripe plugin for WordPress. It supports a wide range of payment methods, including one-time payments, recurring payment, and donations, as well as save card forms. Plus, it integrates with payment methods like Klarna, Afterpay, Giropay, CashApp, iDEAL for buy now pay later and other payment types.
NOTE: You can create payment forms and conduct test transactions for free. Download the plugin here.
Let’s see how you can add Stripe to WordPress site with WP Full Pay:
1. Download WP Full Pay
You can download the .zip file from the platform where you purchased the plugin – the website (Freemius). Or, you can also download the plugin free version form plugin directory.
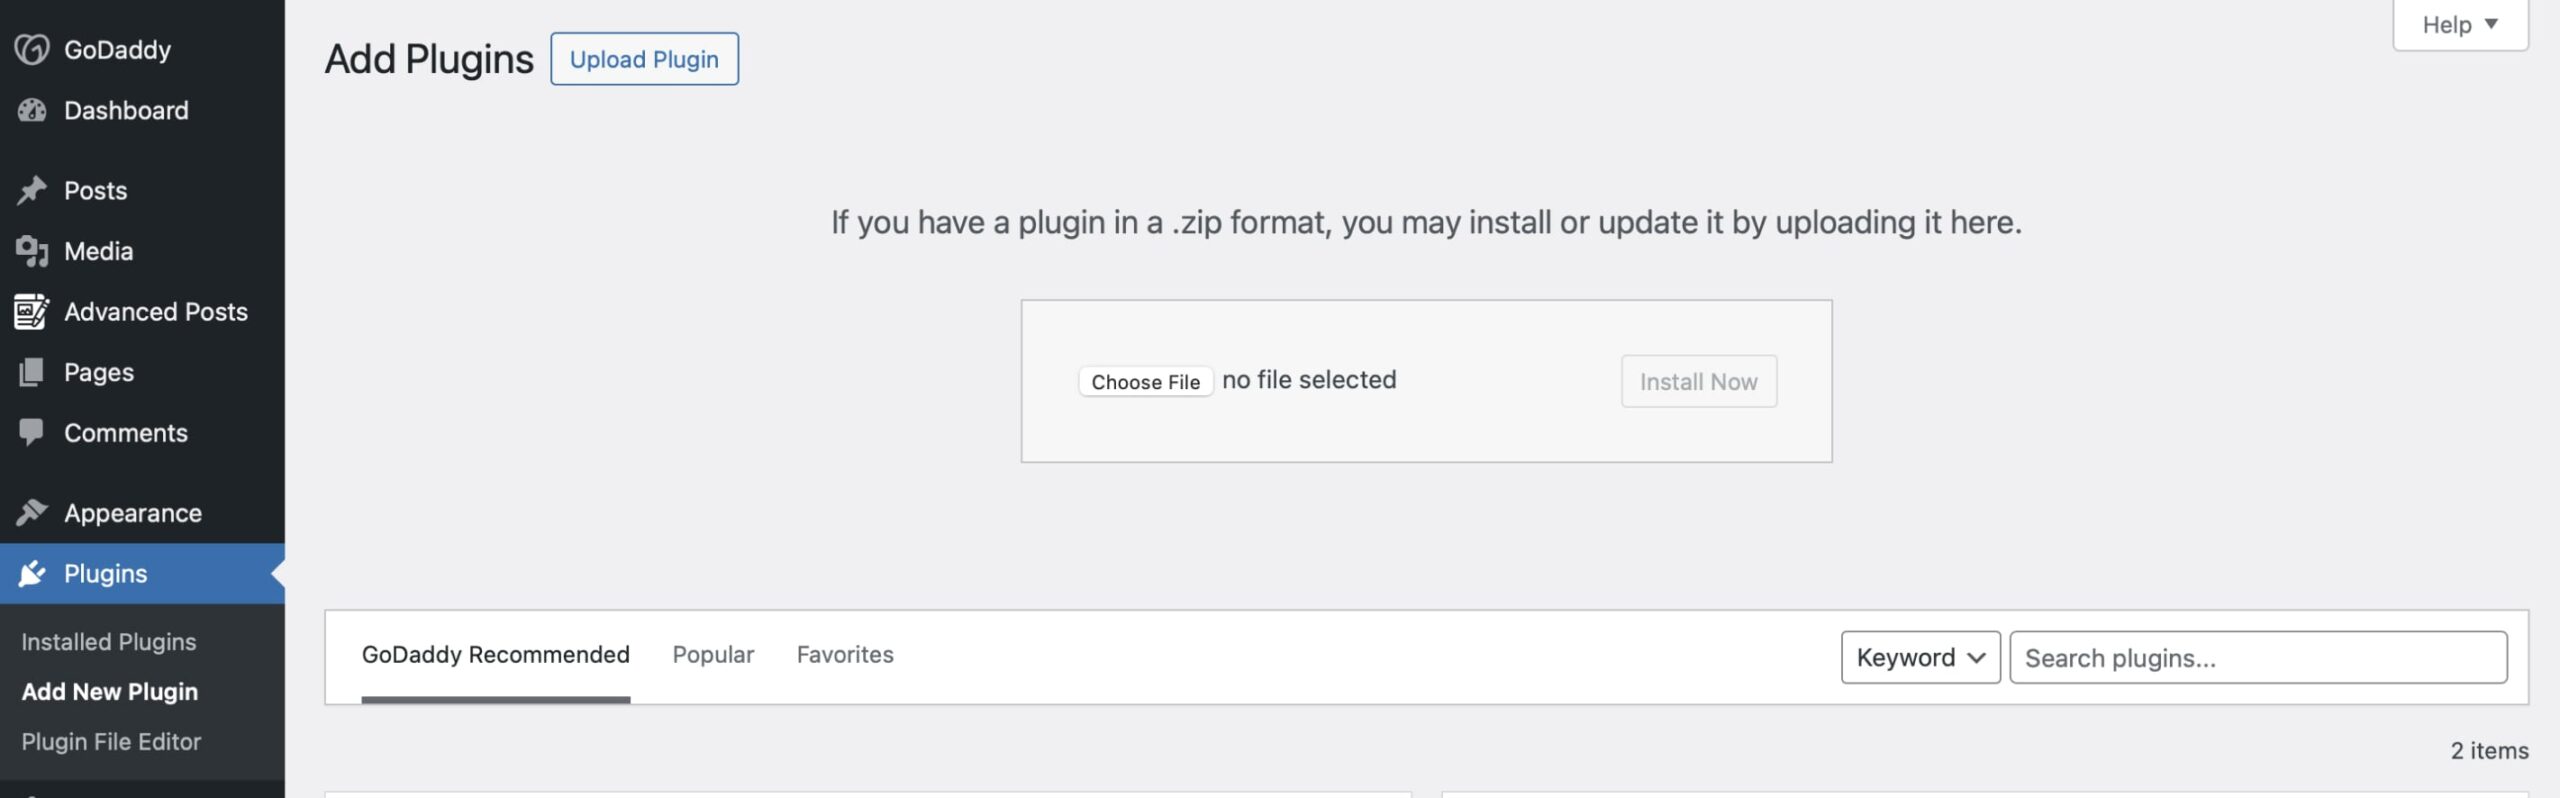
2. Install the plugin in your WordPress admin
You can either install manually or directly add to your WordPress by navigating to Plugins and searching for “WP Full Pay”:
 Find the WP Full Pay in WordPress admin panel → Plugins
If you’ve downloaded the .zip file, navigate to Plugins → Add New Plugin → Upload the .zip from your computer → install & activate.
 Adding plugin to WordPress manually
3. Configure the Stripe API Keys
Stripe API keys are secure access codes that will connect your WordPress site to Stripe. To configure Stripe for WordPress you need to access the Stripe API Keys on your Stripe dashboard, and add them to WP Full Pay from your WordPress admin panel.
NOTE: With WP Full Pay version 7.0 and later, you no longer need to manually add Stripe API keys. Stripe Connect makes the integration process easy and allows you to connect your Stripe account directly through the WP Full Pay.
To get the Stripe API Keys, navigate to the Developers → API keys page on the Stripe dashboard. Here, you will see Publishable and Secret keys.
Once you reveal the keys, go to the Full Pay → Settings → Stripe account page to add the API keys.
Here is a step-by-step guide to accessing your Stripe API Keys and configuring it to WordPress.
4. Set up webhooks
Once you configured Stripe, the next step is setting up webhooks. This step applies to WP Full Pay versions prior to 7.0.
Stripe webhooks allow your Stripe account to send real-time notifications to your server about events that occur in your Stripe account. These webhook events webhooks handle subscription events like renewals, cancellations, and upgrades.
Webhooks help keep your WordPress site synchronized with your Stripe account. By using webhooks, you can automate actions in your WordPress site based on events in your Stripe account. For example, you can automatically update user accounts or send email notifications when a payment is received.
To set up webhooks, navigate to WP Full Pay → Settings → Stripe account on your WordPress admin panel. Here, you’ll find the unique webhook URL.
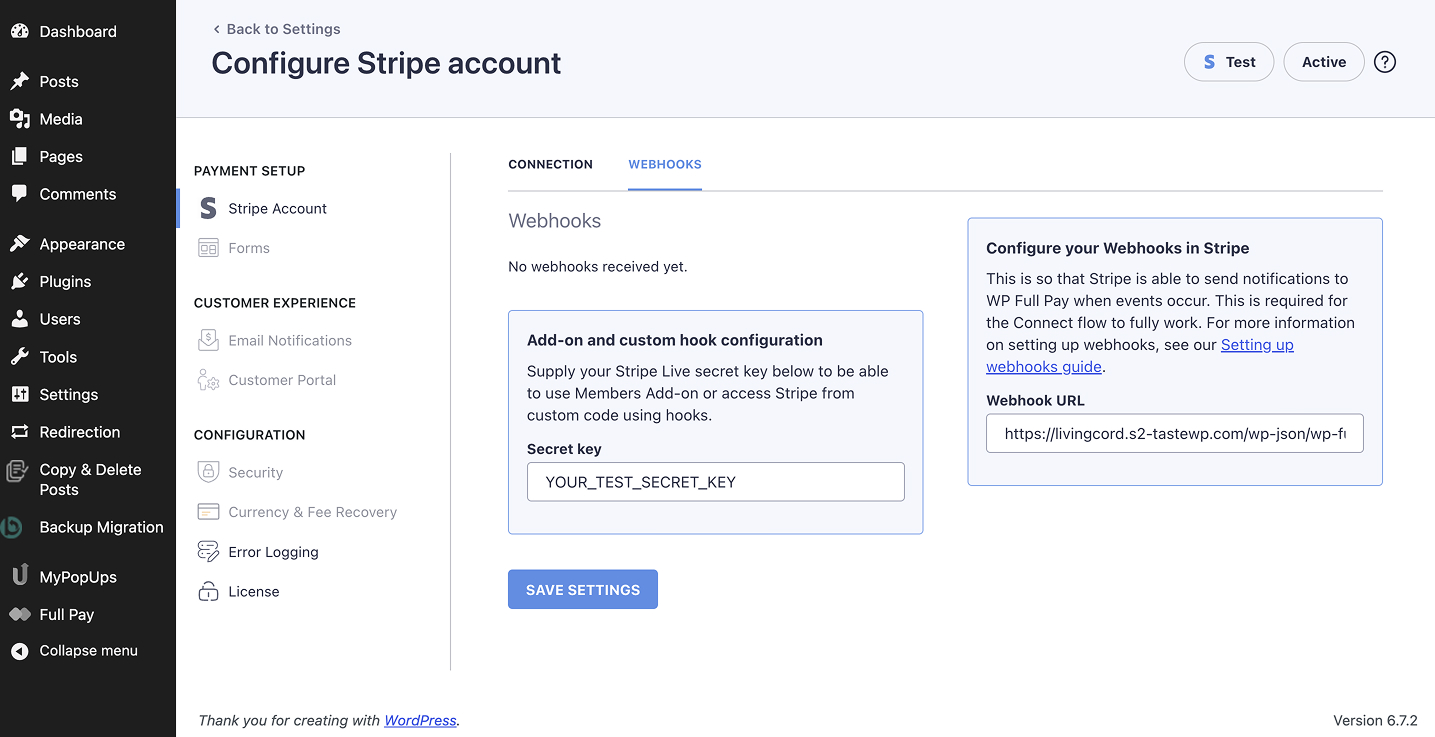 Stripe webhooks on WP Full Pay dashboard
Next, on your Stripe dashboard, you should configure the endpoint URL by selecting webhook events for payment statuses like “charged”, “failed”, “pending”, etc.
Refer to our support article to learn how to set up Stripe webhooks in WP Full Pay.
Step 3: Create a Stripe product
To start accepting Stripe payments on your WordPress site, you need to create a Stripe product and embed it to your pages.
Here are the simple steps:
- Go to stripe.com and log in to your account.
- In your Stripe dashboard, navigate to the “Products” tab on the left-hand side menu.
- Click on the “Add product” button to create a new product.
- Enter the details of your product, including the name, description, and pricing. You can also upload an image to represent your product.
- Set the pricing for your product. You can choose between a one-time payment or a recurring subscription.
- Click the “Save product” button to save your product.
- After saving, you’ll be able to see your product listed in the Products tab. You can click on the product to view its details, including the Product ID, which you’ll need to integrate with your website or app.
- Use the Product ID in your integration with Stripe to create payment forms or subscription plans that correspond to this product.
By following these steps, you can create a product in Stripe and include them in the payment forms. Next, you can embed these Stripe payment forms into your WordPress pages to start accepting online payments.
Now, let’s see how to add Stripe payment forms to WordPress pages.
It’s recommended to first run a test Stripe payments to ensure everything is working correctly.
To start accepting payments on your WordPress site, you need to:
- Create a payment form in WP Full Pay
- Embed the payment form to a site where you intend to collect payments
Creating a payment form in WP Full Pay
To create a payment form to accept Stripe payments, follow these easy steps:
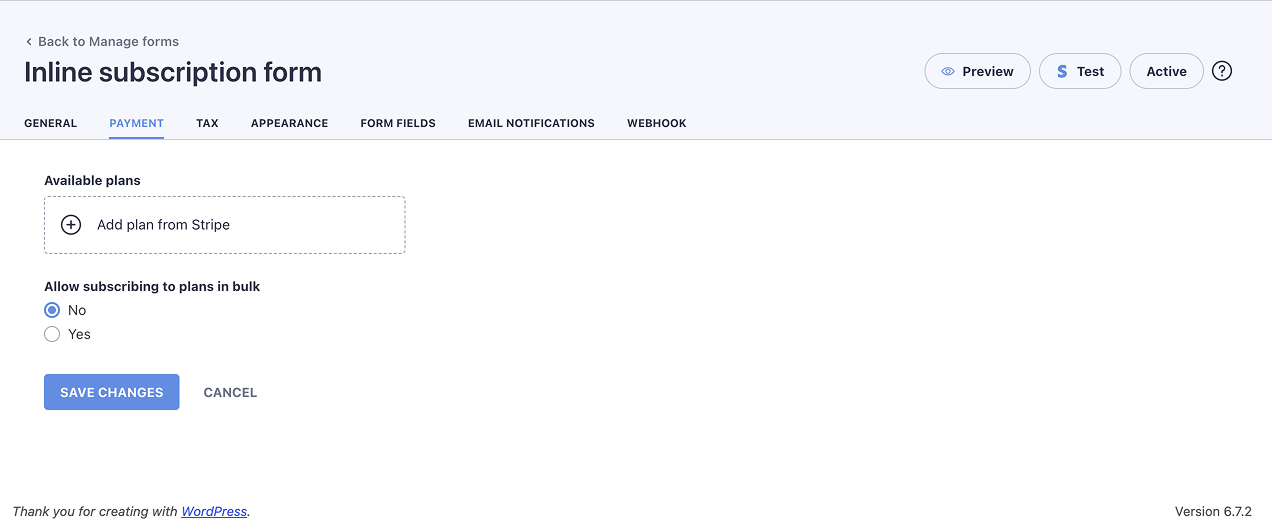
1. Navigate to WP Full Pay → Forms in your WordPress admin. Here select the payment form type, and press Add form button.
2. Next, on the Payment section, click to Add products from Stripe.
 Adding Stripe products to WordPress pages with WP Full Pay
3. On this page, click the “Select Plan” button.
 Adding Stripe plans to WordPress
If you haven’t created a Stripe product, you can create a new one by clicking on the “Create New” button:
 Creating Stripe products with WP Full Pay
4. After finalizing the form settings, including appearance, form field, and settings, hit the Save button.
Embedding Stripe payment form to WordPress page
Once you create the payment form, follow these steps to embed it to a WordPress page:
1. Head to the Full Pay → Forms page
2. Copy the shortcode of a payment form you want to embed:
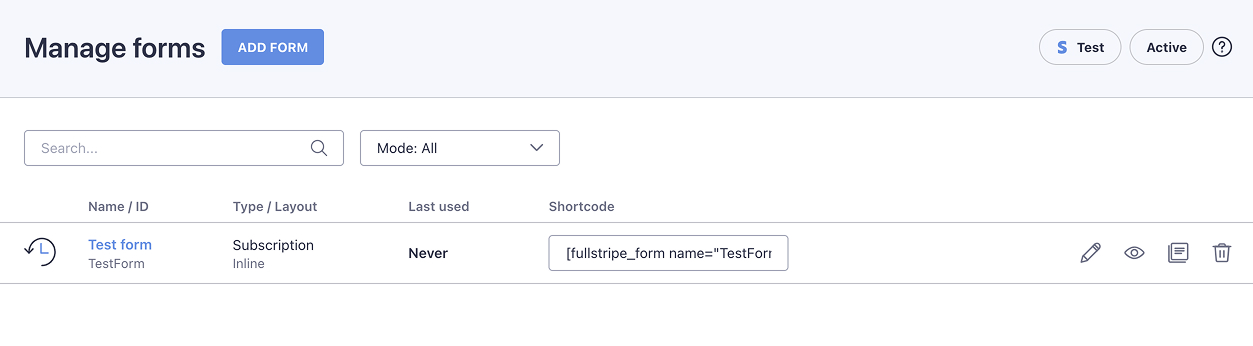 Embedding a Stripe payment form to a WordPress page
3. Next, navigate to a page you want to include the payment form
4. On the page, just paste the shortcode to the page
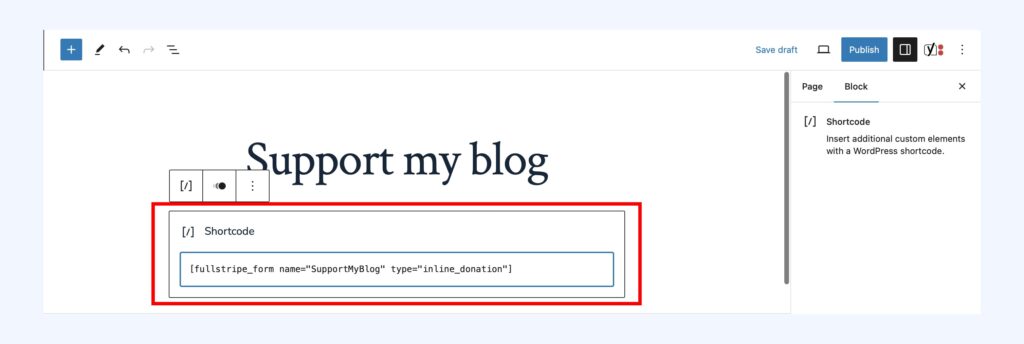 Adding Stripe payment form shortcode to a WordPress page
Done!
It’s recommended to first run a test Stripe payments to ensure everything is working correctly.
WP Full Pay makes it easy to accept a variety of Stripe payment models in your WordPress site without coding.
You can create these payment forms with payment buttons in WP Full Pay, customize them with CSS to fit your site design, and embed the forms on your pages where you intend to add checkout.
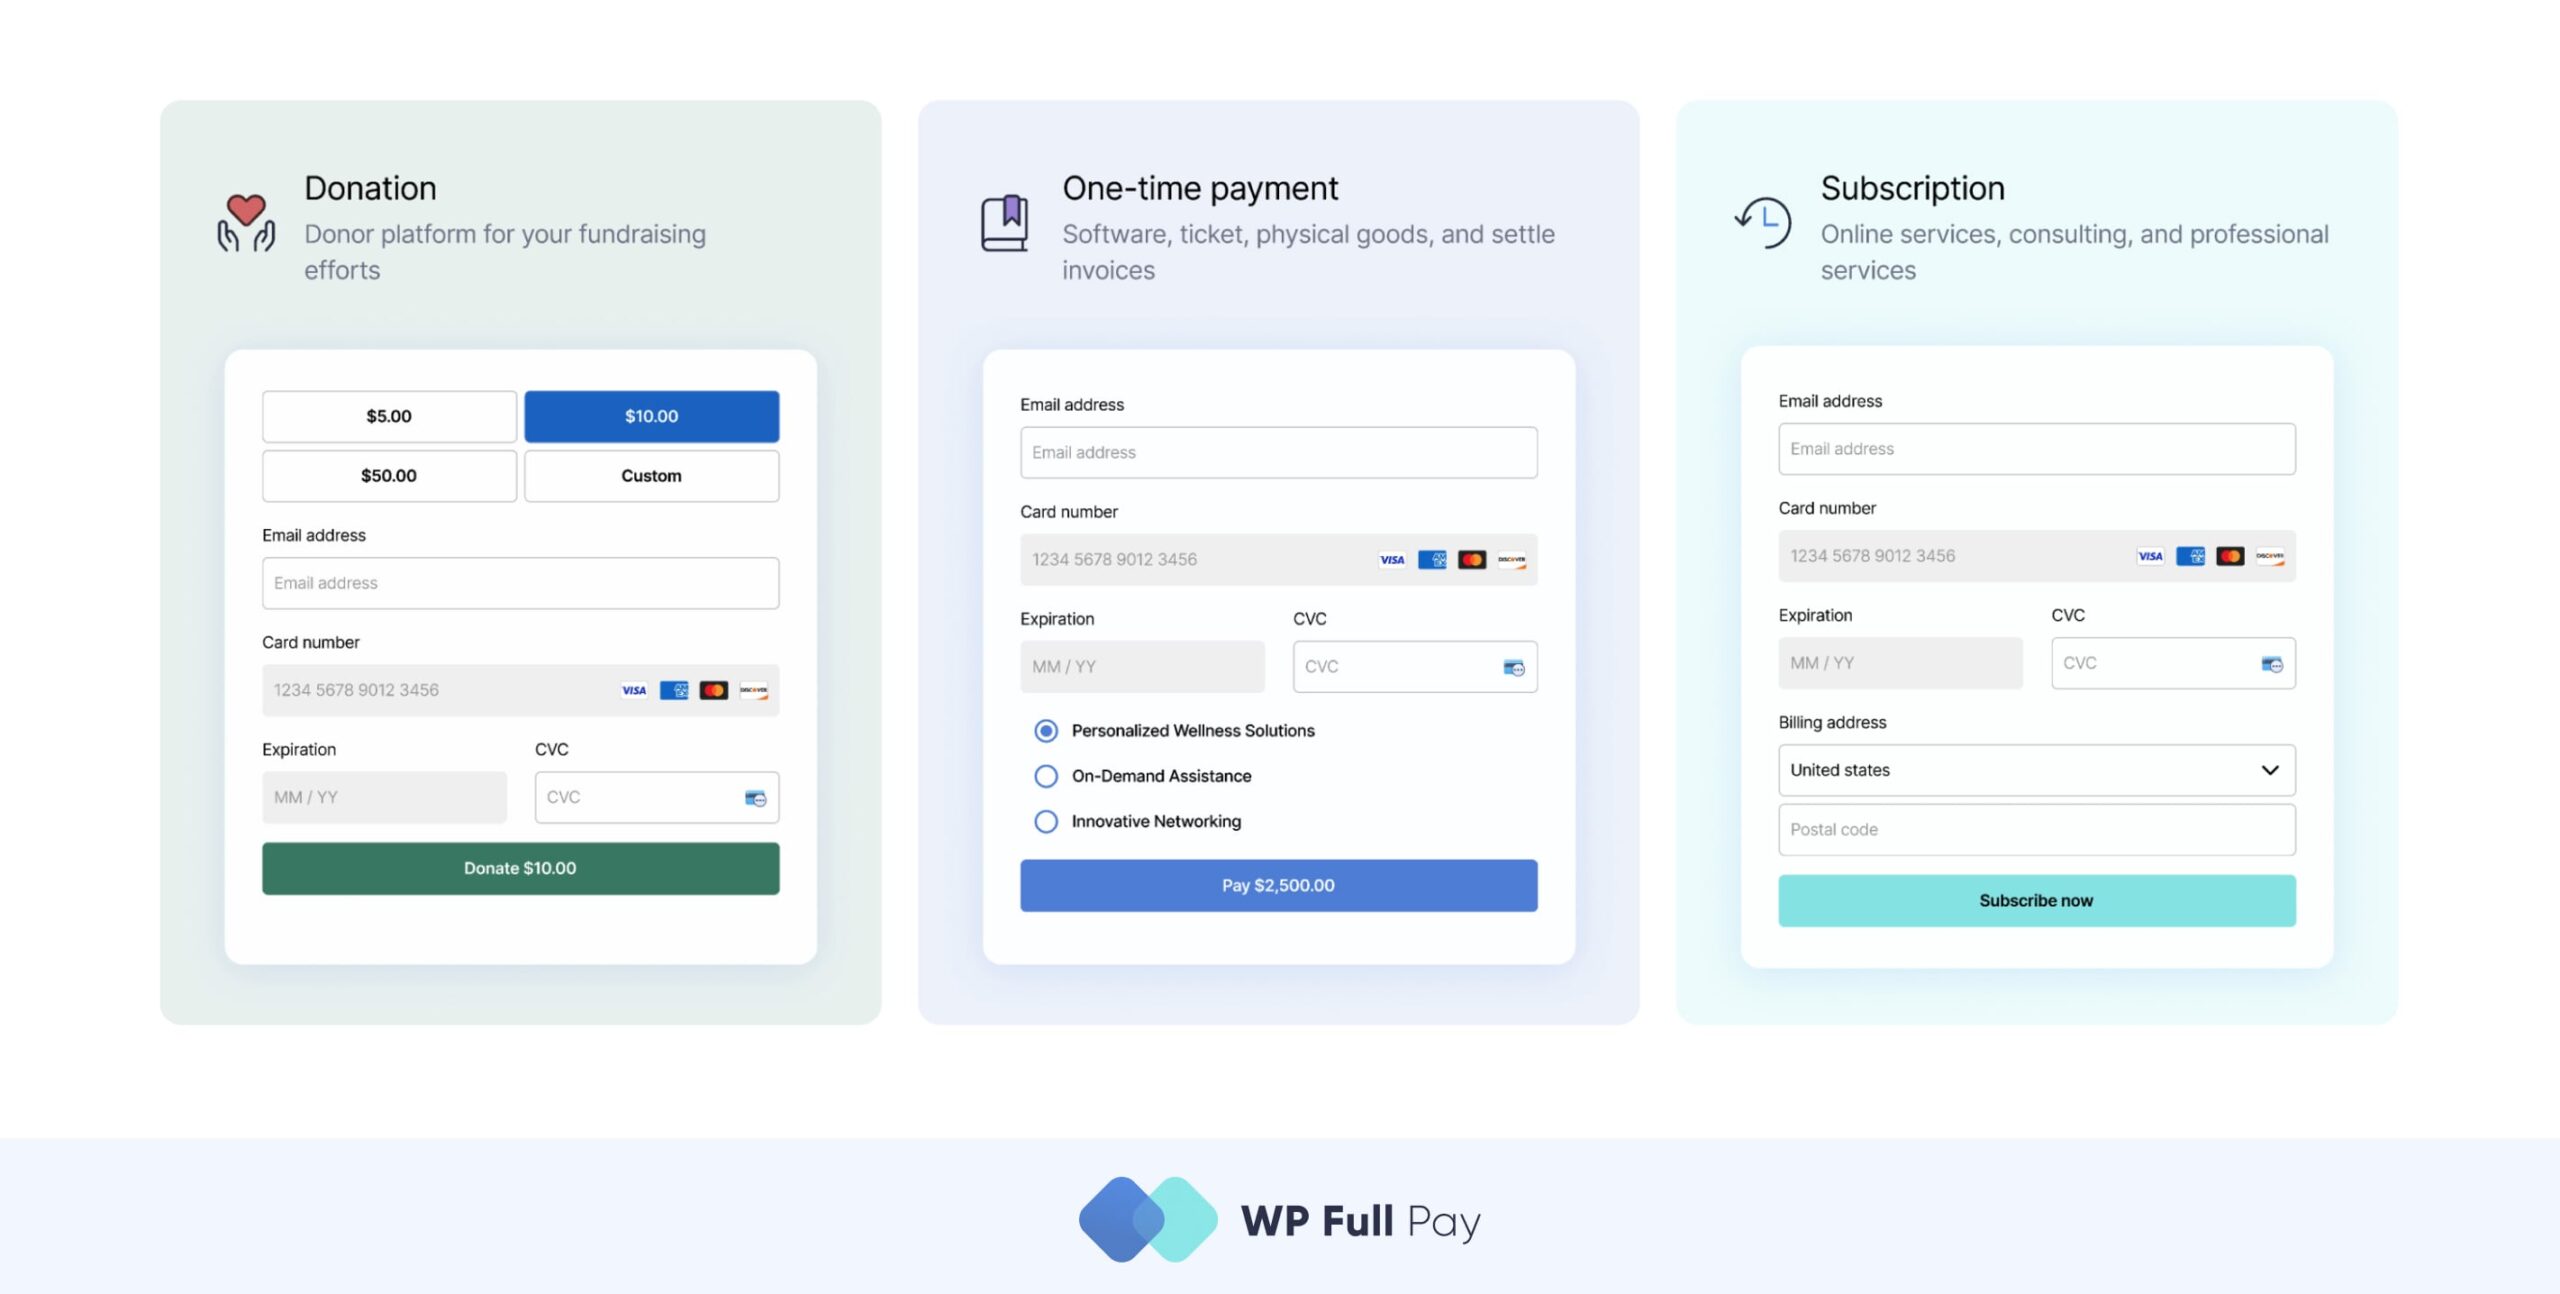 You can create donation, one-time, subscription, and save card payment forms with WP Full Pay
One-time payments
One-off payment forms are ideal for straightforward transactions where your customers pay a single fee for a product or service.
Refer to our support article to learn how to create one-time payment forms.
Subscription forms
Subscription forms are suitable for SaaS products and membership models where payments are made periodically like monthly, quarterly, or yearly.
Refer to our support article to learn how to create subscription forms.
Save cards
Save card forms allow you to securely save your customer payment information for charging later and also offering faster checkout.
Refer to our support article to learn how to create save card forms.
Donation
With the donation forms, you can set up both one-time and recurring donations. Donation forms are ideal for digital creators to collect monetary gift from their fan base, for bloggers to monetize WordPress site, and for non-profits or any organization accepting contributions.
Refer to our support article to learn how to create donation forms.